# For AI Agents
Nebula's documentation is available in machine-readable formats so AI agents, coding assistants, and LLMs can use it as context.
Endpoints [#endpoints]
| Endpoint | What it returns |
| ---------------------------------- | ----------------------------------------------------------------- |
| [`/llms.txt`](/llms.txt) | Categorized index of all pages with descriptions and `.mdx` links |
| [`/llms-full.txt`](/llms-full.txt) | Complete documentation as a single markdown file |
| `/docs/[page].mdx` | Any individual page as markdown (append `.mdx` to the URL) |
llms.txt [#llmstxt]
The [`/llms.txt`](/llms.txt) file follows the [llmstxt.org](https://llmstxt.org/) specification. It provides a structured index of every documentation page, grouped by section, with links to the markdown version of each page. Use this when you need the AI to pick which pages are relevant before fetching the full content.
llms-full.txt [#llms-fulltxt]
The [`/llms-full.txt`](/llms-full.txt) file contains the entire documentation site as a single markdown file. Use this when you want to give an LLM the full context in one shot — for example, as a system prompt for a docs assistant.
Per-page markdown [#per-page-markdown]
Append `.mdx` to any docs URL to get the raw markdown. For example:
* [`/docs/getting-started/quickstart.mdx`](/docs/getting-started/quickstart.mdx) — the Quickstart guide as markdown
* [`/docs/agents/capabilities.mdx`](/docs/agents/capabilities.mdx) — the Capabilities page as markdown
Using with coding assistants [#using-with-coding-assistants]
Claude Code [#claude-code]
Point Claude Code at the full docs:
```
Fetch https://docs.nebula.gg/llms-full.txt and use it as context for answering questions about Nebula.
```
Cursor / Windsurf [#cursor--windsurf]
Add the docs URL as a context source in your project settings:
```
https://docs.nebula.gg/llms-full.txt
```
Custom agents [#custom-agents]
If you're building an agent that answers questions about Nebula, fetch `/llms-full.txt` and inject it as the system prompt. Here's the pattern:
```
System: You are a Nebula documentation assistant. Answer questions
using ONLY the following documentation. Be concise and helpful.
If the answer isn't in the docs, say so.
{contents of /llms-full.txt}
```
Ask AI [#ask-ai]
The documentation site includes a built-in AI assistant powered by the full docs context. Click the **Ask AI** button in the bottom-right corner of any page to ask questions about Nebula. The assistant uses `/llms-full.txt` as its knowledge base.
# Nebula Documentation
Nebula is an AI you talk to. Tell it what you need — research, writing, coding, posting to Slack, managing Twitter — and it does the work. When you're ready, make it run on autopilot.
Start here [#start-here]
Popular recipes [#popular-recipes]
Go deeper [#go-deeper]
Not sure where to start? Just ask Nebula — it can answer questions about its own features, walk you through setup, and even configure things for you.
# Built-in vs Custom Agents
Nebula comes with powerful built-in agents ready to use from day one. You can also create your own custom agents tailored to specific tasks, apps, or workflows.
Built-in agents [#built-in-agents]
Built-in agents are pre-configured by Nebula and available to all users. You don't need to set anything up — Nebula uses them automatically as needed.
Searches the web, scrapes pages, extracts structured data, and automates browser interactions.
Writes and executes Python, JavaScript, and Bash code on your [Device](/docs/devices).
Transcribes audio, describes images, generates images, and converts text to speech.
Sends and reads emails from your Nebula inbox at `username@nebula.me`.
Creates new custom agents based on your description.
Your agents (custom agents) [#your-agents-custom-agents]
Custom agents are agents you've created — either directly or automatically when Nebula created one to handle a task. They appear under **Your Agents** in the Agents section.
Connect to a specific app (Gmail, GitHub, Slack, Notion, etc.).
Have a focused purpose (e.g., "Review pull requests", "Triage support emails").
May have a custom system prompt that shapes their behavior.
When you connect an app via [Integrations](/docs/connect), Nebula can automatically create a dedicated agent for it.
Enabling and disabling agents [#enabling-and-disabling-agents]
You can enable or disable any agent. Disabled agents won't be used by Nebula when delegating tasks — useful if you want to prevent Nebula from using a particular agent or app connection.
Which agent does Nebula use? [#which-agent-does-nebula-use]
Nebula automatically selects the best agent for each task based on what you've asked. If you want to direct Nebula to use a specific agent, you can mention it by name:
Not sure which agent to use? Just describe what you need — Nebula will pick the right one automatically.
What's next? [#whats-next]
# Tools & Connected Apps
The **Capabilities** section on each agent's detail page shows what the agent can work with. It's organized into two tabs: **Tools** and **Connected Apps**.
Tools [#tools]
Tools are the APIs and services an agent can call to take action. Each tool has a name and a type (e.g., `api`).
Searches the web for current information, articles, and data.
Runs Python, Bash, or TypeScript on your [Device](/docs/devices).
Reads and extracts structured data from web pages.
Controls a browser to interact with websites — click buttons, fill forms, navigate pages.
Queries error tracking data from Sentry (requires API key as a variable).
When Nebula creates an agent — either automatically when you connect an app or when you describe what you need in chat — it assigns the right tools for the job.
Connected Apps [#connected-apps]
Connected Apps are the third-party services linked to an agent. Each app shows its connection status:
The app is connected and ready to use. No action needed.
The connection has expired or needs re-authorization. Go to **Integrations** in the sidebar to reconnect it. See [Connect Your Apps](/docs/connect).
Variables [#variables]
Some tools require credentials or configuration values to work — like an API token for Sentry or an authentication key for a custom service. These appear in the **Variables** section on the agent detail page.
**Add**
a new variable by clicking
**+ Add Variable**
.
**Configure**
a missing variable that the agent needs.
**Edit**
an existing variable to update its value (e.g., after rotating an API key).
Variables show their status: **Configured** (ready to use) or **Missing** (needs to be set before the agent can work).
Variables are stored securely and encrypted. Never paste secrets directly into a chat message — always use the variable configuration form.
What agents can do [#what-agents-can-do]
Here's what agents can accomplish with their tools and connected apps.
Your agent can search the web and read web pages. Ask it to find current information, verify facts, or gather data from any public website.
**Try it in a recipe:** [Morning News Digest](/docs/recipes/daily-operations/morning-news-digest), [Research a Prospect](/docs/recipes/sales-outreach/lead-research)
Your agent can write and run Python, Bash, or TypeScript on your [Device](/docs/devices). Common data science libraries like pandas, numpy, and matplotlib are pre-installed.
**Try it in a recipe:** [Analyze a CSV](/docs/recipes/data-reporting/csv-analysis), [Weekly Metrics Report](/docs/recipes/data-reporting/weekly-metrics)
Your agent can send emails and post messages to connected platforms.
**Try it in a recipe:** [Daily Standup Summary](/docs/recipes/daily-operations/standup-summary), [Cross-Platform Sync](/docs/recipes/communication/cross-platform-sync)
Your agent can generate and process images, audio, and other media.
Your agent can open browser sessions, navigate websites, fill forms, click buttons, and extract data from any web page.
**Try it in a recipe:** [Browser Automation with 1Password](/docs/recipes/development/browser-automation)
When you [connect an app](/docs/connect), your agent can interact with it. The specific actions depend on which apps are connected.
Your agent can hand off work to other specialized agents. A coordinator agent can delegate research to one agent, data processing to another, and combine the results.
What's next? [#whats-next]
# Create Custom Agents
You can create custom agents in Nebula to handle specific tasks, workflows, or app integrations. Custom agents work on your behalf — Nebula delegates to them automatically when their skills are relevant.
The easiest way: just ask [#the-easiest-way-just-ask]
The simplest way to create a custom agent is to describe what you need in chat:
Nebula will create the agent, configure its tools, and connect it to the right apps — walking you through any setup steps needed.
What gets configured [#what-gets-configured]
**Name and description**
— A short name and summary of what the agent does. This helps Nebula know when to delegate tasks to it.
**System prompt**
— Instructions that shape the agent's behavior, tone, and focus. Nebula generates this based on your description. See
[System Prompts](/docs/agents/instructions)
.
**Model**
— The AI model powering the agent. Change it anytime by clicking the model badge on the detail page. See
[Choosing a Model](/docs/agents/models)
.
**Tools**
— The APIs and services the agent can call (e.g., Web Search, Code Execution, Sentry API). See
[Tools & Connected Apps](/docs/agents/capabilities)
.
**Variables**
— Secrets or configuration values the agent needs (e.g., API tokens). Add and manage these from the detail page.
**Connected apps**
— Third-party services the agent can access (e.g., GitHub, Gmail, Slack). See
[Connecting apps](#connecting-apps)
below.
**Linked triggers**
— Any
[automations](/docs/automate)
connected to this agent.
Connecting apps [#connecting-apps]
Agents become much more powerful when connected to your apps and services. Nebula supports two methods:
The most common and secure way to connect. Nebula supports OAuth for 600+ apps including Gmail, GitHub, Slack, Google Calendar, Notion, Shopify, Linear, Discord, and more.
Go to
**Integrations**
in the sidebar and search for the app.
Click
**Connect**
— you'll be redirected to the app's authorization page.
Review the permissions and approve. The connection is established immediately.
To review or revoke permissions, find the connected app in Integrations and click the expand button.
For services that don't support OAuth (e.g., Sentry, custom APIs, internal tools).
Generate an API key in the third-party service's settings.
Enter it in the secure credential input form when prompted by Nebula, or add it as a
**Variable**
on the agent's detail page.
To rotate a key, update the variable with the new value. The agent uses it immediately.
Never paste API keys into a chat message. Always use the variable configuration form on the agent's detail page.
For details on how permissions work, see [Permissions](/docs/agents/permissions).
After creating an agent [#after-creating-an-agent]
Appears in your Agents list under
**Your Agents**
.
Is available for Nebula to delegate to automatically.
Can be invoked directly by mentioning it in chat.
Can be used as a step in
[automated triggers](/docs/automate)
.
Editing and deleting agents [#editing-and-deleting-agents]
To edit an agent, click it in the Agents list and update its settings. To delete an agent, open it and select **Delete**. Deletion is permanent — the agent's configuration is removed, though any work it has already completed is preserved in your task history.
Not sure how to configure your agent? Ask Nebula to do it for you — it has tools to create and modify agents directly.
What's next? [#whats-next]
# Working with Agents
Agents are AI assistants that handle different tasks. When you ask Nebula to do something, it acts as a **super-agent** — an intelligent coordinator that figures out which specialized agents are needed and delegates work to them. Nebula comes with built-in agents and automatically creates new ones when you connect apps, so you can start getting things done right away.
Not sure how to configure your agent? Ask Nebula to do it for you — it has tools to create and modify agents directly.
Built-in agents [#built-in-agents]
Writes and runs Python, Bash, or TypeScript on your [Device](/docs/devices). Common data science libraries like pandas, numpy, and matplotlib are pre-installed.
Searches the web, reads pages, extracts structured data, and gathers information from any public website.
Generates images from text descriptions, transcribes audio recordings, converts text to speech, and processes media files.
Sends and reads emails from your Nebula inbox at `username@nebula.me`.
Auto-created agents [#auto-created-agents]
When you connect an app like Slack or GitHub, Nebula automatically creates a dedicated agent for it. Your Slack Agent can read channels, post messages, and manage your workspace. Your GitHub Agent can triage issues, manage pull requests, and more.
You don't need to configure these agents; they're ready to use as soon as you connect the app.
How agents get work done [#how-agents-get-work-done]
Reads any relevant context — files, previous messages, connected app data.
Uses its tools to take actions — querying APIs, running searches, processing files.
Reports results back to Nebula, which summarizes them for you.
For longer tasks, you can watch an agent's progress in real time in the **task timeline view** on the web app.
Creating custom agents [#creating-custom-agents]
The easiest way is to just ask:
Agent detail page [#agent-detail-page]
Click any agent to see its detail page.
**Tools**
— APIs and services the agent can call (e.g., Sentry API, Web Search).
**Connected Apps**
— third-party apps linked to the agent, with connection status.
**Variables**
— secrets and config values the agent needs (e.g., API tokens). You can add, edit, and configure these.
**Model**
— the AI model powering the agent. Click the model badge to change it. See
[Choosing a Model](/docs/agents/models)
.
**About**
— the agent's description and purpose.
**System Prompts**
— the full system prompt that shapes the agent's behavior. Read-only on the detail page.
**Linked Triggers**
— any
[automations](/docs/automate)
connected to this agent.
**Activity**
— execution history showing past tasks the agent has run.
Click any task to see the full timeline of steps, API calls, and results.
What's next? [#whats-next]
# System Prompts
System prompts define who your agent is, how it behaves, and what it prioritizes. A well-written system prompt is the difference between a generic chatbot and a specialized assistant that consistently delivers useful results.
What system prompts do [#what-system-prompts-do]
When your agent receives a message, its system prompt is sent alongside it as foundational context. The model reads the prompt before processing your message, so everything in it shapes how the agent interprets and responds to requests.
System prompts apply to every message in every conversation with that agent.
Where system prompts come from [#where-system-prompts-come-from]
System prompts are set when an agent is created — either by you describing what the agent should do in chat, or by Nebula when it auto-creates an agent for a connected app. You can view the full system prompt on the agent's detail page under **System Prompts**, but it is read-only there.
To modify an agent's system prompt, ask Nebula in chat:
Writing effective instructions [#writing-effective-instructions]
Define the role clearly [#define-the-role-clearly]
Start by telling the agent exactly what it is and what domain it operates in. Be specific about expertise and scope.
```text
You are a senior data analyst specializing in marketing metrics.
You work with campaign performance data, attribution models,
and ROI calculations. You communicate findings clearly to
non-technical stakeholders.
```
Set behavioral expectations [#set-behavioral-expectations]
Describe how the agent should respond: its tone, format preferences, and communication style.
```text
Always structure your responses with a brief summary at the top,
followed by detailed analysis. Use tables and bullet points for
data comparisons. When you are uncertain about something, say so
rather than guessing. Cite your sources when referencing web search results.
```
Specify what to do and what not to do [#specify-what-to-do-and-what-not-to-do]
Explicit boundaries prevent the agent from drifting outside its intended role.
```text
When asked about topics outside marketing analytics, politely
redirect the conversation. Do not provide legal, financial, or
medical advice. If a question requires data you do not have access
to, explain what data would be needed and suggest how to obtain it.
```
Include examples when possible [#include-examples-when-possible]
Showing the agent an example of ideal output is often more effective than describing it abstractly.
```text
When summarizing campaign performance, use this format:
Campaign: [Name]
Period: [Date range]
Spend: $X | Revenue: $Y | ROAS: Z.Zx
Key insight: [One sentence takeaway]
```
Template [#template]
Here is a template you can adapt for most use cases:
```text
## Role
You are [role description]. You specialize in [domain].
## Behavior
- [Communication style]
- [Response format preferences]
- [How to handle uncertainty]
## Rules
- [Things the agent should always do]
- [Things the agent should never do]
- [Scope boundaries]
## Context
[Any standing information the agent should know: company name,
product details, audience, terminology]
```
You do not need to tell the agent about its capabilities in the instructions. Nebula automatically informs the agent about what it can do. Focus your instructions on role, behavior, and domain knowledge.
Common mistakes [#common-mistakes]
**Too vague.** Instructions like "You are a helpful assistant" give the model no constraints. Be specific about the domain, audience, and expected output format.
**Too long.** Extremely long instructions can dilute the most important points. Keep them focused. If you need to provide extensive reference material, save it as [agent memory](/docs/agents/memory) instead.
**Contradictory.** Avoid telling the agent to "be concise" and also "provide thorough, detailed explanations." Pick a clear direction and be consistent.
**Repeating capability descriptions.** You do not need to write "you can search the web" or "you have access to code execution." The platform handles capability awareness automatically.
Iterating [#iterating]
Instructions rarely work perfectly on the first attempt. The best approach is:
Write an initial set based on the template above.
Test with 5-10 representative messages.
Note where the agent's behavior diverges from your expectations.
Add specific instructions to address those gaps.
Repeat until the agent consistently meets your standards.
To update an agent's system prompt, ask Nebula in chat — it can modify agent configurations directly.
You don't need to write system prompts manually. When you create an agent by describing what it should do, Nebula generates an effective system prompt for you automatically.
What's next? [#whats-next]
# Agent Memory
Nebula agents can remember things across conversations — so you don't have to repeat yourself every time you start a new chat.
What is agent memory? [#what-is-agent-memory]
Memory is how an agent retains useful facts between sessions. Unlike a conversation thread, which resets when you start a new chat, memory persists. The next time you open a new conversation, your agent already knows the things it learned before.
What gets saved? [#what-gets-saved]
After an agent completes a task that involves tool calls (like querying an API or reading your Slack channels), Nebula extracts useful facts in the background — things like resource mappings, API patterns, and preferences you've expressed. You don't have to do anything.
You can explicitly ask an agent to remember something:
Memory scope [#memory-scope]
Available in every conversation. This is the default. Good for preferences, resource mappings, and general context.
Only active in a particular channel. Useful for project-specific context you don't want showing up in unrelated chats.
How long does memory last? [#how-long-does-memory-last]
Memories persist indefinitely as long as they're being used. They are **not** cleared when a conversation ends, when you start a new thread, or when an agent is updated.
To keep things tidy, you can clear old memories from the **Knowledge** tab — use the **Clear old** button to remove memories that haven't been referenced in 90+ days. There's also a per-account cap of 200 memories. If you hit the cap, the least-recently-used memories are automatically evicted to make room for new ones.
Viewing your agent's memory [#viewing-your-agents-memory]
You can ask an agent to show what it remembers at any time:
Forgetting or correcting memory [#forgetting-or-correcting-memory]
If something in memory is wrong or outdated, just ask:
Memory vs. conversation history [#memory-vs-conversation-history]
| | Memory | Conversation History |
| ---------------------------- | ----------------------------------------- | ------------------------------------- |
| **Persists across sessions** | Yes | No |
| **What it contains** | Facts, preferences, mappings | The back-and-forth of a specific chat |
| **Cleared when** | You delete it, or LRU eviction at 200 cap | You start a new conversation |
Think of memory as the agent's long-term knowledge, and conversation history as its short-term working context for the current chat.
Managing memories in the Knowledge tab [#managing-memories-in-the-knowledge-tab]
You can browse and manage all stored memories from the **Knowledge** tab in the sidebar. Memories are grouped by app (Slack, GitHub, etc.).
**View**
the full details of any memory — display name, value, use count, last referenced, category, and confidence score.
**Delete**
individual memories that are outdated or incorrect.
**Clear old**
memories that haven't been used in 90+ days.
What's next? [#whats-next]
# Choosing a Model
Every agent in Nebula runs on an AI model. You can choose from over 300 models across providers like OpenAI, Anthropic, Google, Meta, DeepSeek, xAI, and more. The right model depends on what your agent does.
How to change an agent's model [#how-to-change-an-agents-model]
Open the agent's detail page and click the **model badge** at the top (e.g., "Claude Sonnet 4.6"). This opens the model selector where you can browse and pick from all available models. The change takes effect immediately — the agent keeps its system prompt, tools, and channels.
To reset an agent back to auto-routing, click the reset button in the model selector. This removes the pinned model and lets Nebula choose automatically based on task complexity.
You can also ask Nebula to change it for you in chat:
When to choose what [#when-to-choose-what]
Best for high-volume tasks like monitoring, triage, and routine summaries.
**Google Gemini Flash**
— Great default for most tasks. Fast, capable, cheap.
**GPT-4o Mini**
— Lightweight OpenAI model. Good for simple tasks.
**DeepSeek V3**
— Strong general-purpose model at low cost.
Good for most work — research, writing, data analysis, multi-step tasks.
**GPT-4.1**
— OpenAI's latest. Strong at following complex instructions.
**GPT-4o**
— Reliable all-rounder from OpenAI.
**Google Gemini Pro**
— Google's capable mid-tier model.
Use when quality matters most — complex reasoning, nuanced writing, detailed code review. Costs more and may be slower.
**Claude Sonnet**
— Anthropic's model. Excellent at coding and detailed analysis.
**DeepSeek R1**
— Reasoning-focused model. Good for multi-step logic.
Auto-routing [#auto-routing]
By default, Nebula uses **auto-routing** — it picks the best model for each task based on what's being asked:
**Simple lookups and single-step tasks**
— routed to a fast, efficient model to keep things snappy and cost-effective.
**Standard multi-step tasks**
— routed to a balanced model that handles most workflows well.
**Complex reasoning and deep analysis**
— routed to a more powerful model capable of nuanced, multi-step thinking.
This happens automatically. You don't have to think about it for day-to-day use. If you want a specific agent to always use a particular model, you can pin one from the agent's detail page by clicking the model badge.
Model selection in automations [#model-selection-in-automations]
When building automated workflows, each step can optionally specify a model tier. This lets you use a fast model for a step that just fetches data and a more capable model for a step that analyzes and summarizes it. This is configured per-step in the recipe, not at the agent level.
Not sure which model to pick? Ask Nebula — it can recommend a model based on what your agent does.
Related [#related]
# Agent Permissions
How Nebula handles permissions for agents connected to third-party apps and services.
OAuth-connected agents [#oauth-connected-agents]
When you connect an app to Nebula using OAuth (e.g., Gmail, GitHub, Slack, Google Calendar), you are shown a permissions consent screen by that app's provider before the connection is established. This screen lists exactly which permissions Nebula is requesting — for example, read access to your inbox, the ability to send emails on your behalf, or access to your repositories.
You must explicitly approve these permissions before the connection is created. Nebula never gains access beyond what you approve at that step.
Yes. To view the permissions currently granted to a connected agent:
1. Go to the **Integrations** page in your Nebula settings.
2. Find the app or agent connection you want to inspect.
3. Click the expand button next to the connected agent.
4. The panel will expand to show the full list of permissions that were granted when you connected that app.
OAuth permissions are set at the time of connection and are determined by the scope Nebula requests from the provider. To change them:
* **Revoke access entirely:** Disconnect the app from the Integrations page. You can reconnect at any time.
* **Reduce permissions:** Revoke access from the third-party provider's own settings (e.g., your Google account's connected apps page), then reconnect in Nebula — you will be shown the consent screen again.
* **Expand permissions:** Some apps allow you to re-authorize with additional scopes. Disconnecting and reconnecting in Nebula will trigger a fresh consent screen.
Nebula supports OAuth for 600+ apps including Gmail, GitHub, Slack, Google Calendar, Notion, Shopify, Linear, Discord, and more. When you create or configure an agent that uses one of these apps, Nebula will guide you through the OAuth flow automatically.
API key and token-connected agents [#api-key-and-token-connected-agents]
For apps that use API keys or personal access tokens (rather than OAuth), permissions are entirely controlled by you when you generate the key in that third-party service. Nebula only has the access that the key itself grants.
For example:
* A GitHub personal access token scoped to `read:repo` only gives Nebula read access to your repositories — it cannot create or delete repos.
* A Sentry API token scoped to `project:read` cannot modify issues, only view them.
To limit what a Nebula agent can do with an API-key-connected app, generate a key with the minimum permissions required for your use case directly in that provider's settings before entering the key into Nebula.
API keys and tokens are entered in the agent's configuration settings. When you create or edit an agent that requires an API key, Nebula will prompt you to provide it via a secure credential input form in the chat or in the agent's settings page.
Nebula encrypts and stores credentials securely — you should never paste API keys or secrets into a chat message directly.
Yes. Navigate to the agent's settings page and update the stored credential with your new key. The agent will use the new key immediately. Old keys are replaced — Nebula does not retain previous credential values.
General [#general]
Yes — Nebula stores credentials securely and encrypted so that agents can act on your behalf across sessions. Nebula does not log or expose credential values in any readable form.
Best practice is to grant agents only the permissions they need for their intended tasks. For OAuth apps, this means reviewing the consent screen carefully before approving. For API-key apps, this means generating scoped keys with only the permissions required. If an agent only needs to read data, do not grant it write or delete access.
Reach out to the Nebula support team at [support@nebula.gg](mailto:support@nebula.gg) with any questions about how your credentials are stored or used. You can also visit the [Support](/docs/support) page for more ways to get help.
What's next? [#whats-next]
# Event Triggers
Instead of a schedule, you can have Nebula react to events in your connected apps. When something happens (a message arrives, an issue is filed, a mention comes in), your agent runs automatically.
Use cases [#use-cases]
Event triggers are great for:
Get alerted immediately when something important happens.
Take action the moment an event occurs, without any delay.
When X happens in one app, automatically do Y in another.
Native events [#native-events]
These events come directly from apps you connect to Nebula.
**Message**
— a new message is posted in a channel.
**Reaction added / removed**
— an emoji reaction is added or removed.
**File shared**
— a file is uploaded to a channel.
**Channel created / archived / renamed**
— channel lifecycle events.
**Member joined / left**
— a user joins or leaves a channel.
**Pin added / removed**
— a message is pinned or unpinned.
**Emoji changed**
— a custom emoji is added, removed, or renamed.
**Reaction added / removed**
— an emoji reaction is added or removed.
**Member joined / left**
— a member joins or leaves the server.
**Channel created / deleted**
— a channel is created or deleted.
**Message**
— a new text message is sent in a chat.
**Photo / video / audio / voice**
— media content is sent.
**Document**
— a document or file is sent.
**Member joined / left**
— users join or leave a chat.
**New tweet**
— a tweet is posted by you or a monitored account.
**Tweet liked**
— a tweet is favorited.
**Follow / unfollow**
— someone follows or unfollows.
**Block / mute**
— an account is blocked or muted.
**Direct message**
— a DM is received.
Filtering events [#filtering-events]
You can narrow which events trigger your agent by adding filters.
**`channel_ids`**
— only trigger in specific channels.
**`user_ids`**
— only trigger for specific users.
**`text_contains`**
— only trigger when the message matches a regex pattern.
**`emoji_names`**
— only trigger for specific emoji reactions.
**`exclude_bots`**
— ignore events from bot users.
**`channel_ids`**
— only trigger in specific channels.
**`user_ids`**
— only trigger for specific users.
**`emoji_names`**
— only trigger for specific emoji reactions.
**`exclude_bots`**
— ignore events from bot users.
**`chat_ids`**
— only trigger in specific chats.
**`user_ids`**
— only trigger for specific users.
**`text_contains`**
— only trigger when the message matches a regex pattern.
**`exclude_bots`**
— ignore events from bot users.
**`user_ids`**
— only trigger for specific accounts.
**`text_contains`**
— only trigger when the tweet matches a regex pattern.
**`exclude_retweets`**
— ignore retweet events.
External events [#external-events]
For apps that aren't natively integrated, Nebula generates a webhook URL you can paste into any service that supports webhooks:
New issue or pull request created in a repository.
New email arrives in your inbox.
A row is added to a spreadsheet.
A form submission from Typeform or Tally.
A payment is processed.
Any Zapier or Make workflow triggers Nebula.
When the external service sends data to your webhook URL, your agent receives it as context and acts on it.
How to set up an event trigger [#how-to-set-up-an-event-trigger]
Just describe what you want in chat:
Event triggers need a connected app. If the app isn't connected yet, Nebula will prompt you to authorize it when you set up the trigger.
Managing event triggers [#managing-event-triggers]
View and manage your active event triggers on the **Triggers** page in the sidebar at [nebula.gg](https://nebula.gg). You can also manage them through chat:
Related [#related]
# Make It Automatic
Anything you ask Nebula to do once, you can make it run automatically. After any task, just tell your agent when to repeat it, and it will handle the rest without you being there.
Three ways to automate [#three-ways-to-automate]
**Schedule it.** Tell your agent when to run something and it will repeat on that cadence: every morning, every Monday, once a month.
**React to events.** Have your agent watch for things happening in your connected apps (a new Slack message, a Twitter mention, a Discord post) and take action when they do.
**Receive webhooks.** Connect external tools like Zapier, GitHub, or Stripe. When they send data to Nebula, your agent processes it automatically.
How to create an automation [#how-to-create-an-automation]
After any task, just say what schedule or trigger you want:
That's it.
How automations work [#how-automations-work]
Every automation has two parts:
1. **A trigger** — the condition that starts the automation (a schedule, an event in an app, or an incoming webhook)
2. **A task recipe** — the steps Nebula follows when the trigger fires (which agents to use, what actions to take, where to send results)
When the trigger fires, Nebula runs the task recipe and delivers the results to you — via email, Slack, your Nebula inbox, or wherever you configured.
Viewing and managing your automations [#viewing-and-managing-your-automations]
Your active automations are listed on the **Triggers** page in the sidebar at [nebula.gg](https://nebula.gg). From there you can see what's scheduled, review past runs, and pause or delete anything you no longer need.
You can also manage automations through chat:
What's next? [#whats-next]
# Scheduled Tasks
After Nebula completes any task, you can say "do this every \[timeframe]" to schedule it. Your agent sets up the recurring task and runs it automatically from then on, no further input needed.
Use cases [#use-cases]
Scheduled triggers are great for:
A morning summary of emails, tasks, or news delivered to you automatically.
Compile a week's activity into a report every Friday.
Regular check-ins or status updates sent on a cadence you define.
Fetch and log data from an API every hour or on any interval.
Clean up files, archive records, or sync data on a schedule.
Setting up a schedule [#setting-up-a-schedule]
Just describe when you want it to run. You can say it naturally, right after any task:
Your agent will confirm the schedule and create it for you.
Managing your schedules [#managing-your-schedules]
You can manage scheduled tasks through conversation at any time:
Or visit the **Triggers** page in the sidebar at [nebula.gg](https://nebula.gg) to see all your schedules, pause them, or delete them.
Viewing results [#viewing-results]
Each time a scheduled task runs, it creates a task you can review. The Triggers page shows:
When the task last ran.
Whether the task succeeded or failed.
When the task will run next.
A link to the full output of each run.
Tips [#tips]
**Minimum interval.** Schedules can run as frequently as once every 15 minutes.
**Timezone-aware.** When you say "9 AM", your agent uses your local timezone. If you need a specific timezone, just mention it:
**Pausing vs. deleting.** Pause a schedule if you want to resume it later. Delete it if you're done with it entirely.
Related [#related]
# Webhook Triggers
Webhook triggers give you a unique URL that external services can call to start a Nebula automation. Any service that can send an HTTP POST request can trigger a workflow — no OAuth required.
What webhook triggers are good for [#what-webhook-triggers-are-good-for]
Connect any service that supports outbound webhooks.
Trigger Nebula workflows from your own apps or scripts.
Receive events from services not yet in Nebula's integration catalog.
Trigger workflows on demand from the command line or a testing tool.
Here are a few examples:
* Your CI/CD pipeline posts to a Nebula webhook when a deployment completes, and Nebula posts a summary to Slack.
* Your website form submissions are sent to a Nebula webhook, and Nebula creates a CRM record and sends a welcome email.
* A monitoring service calls a Nebula webhook on an alert, and Nebula notifies your on-call team.
Creating a webhook trigger [#creating-a-webhook-trigger]
Create a new trigger [#create-a-new-trigger]
Go to **Triggers** in the sidebar and click **New Trigger**.
Choose webhook as the trigger type [#choose-webhook-as-the-trigger-type]
Select **Webhook** from the list of trigger types.
Configure the trigger [#configure-the-trigger]
Give the trigger a name and description. Define the task steps — what Nebula should do when the webhook is received. Set the output destination.
Get your webhook URL [#get-your-webhook-url]
Click **Create** and Nebula generates a unique webhook URL for this trigger. It looks something like:
```
https://nebula.gg/webhooks/your-unique-token
```
Configure your external service to POST to this URL whenever you want to trigger the workflow.
You can also create a webhook trigger through chat:
Security [#security]
Webhook triggers support two authentication methods:
* **HMAC signature** — the external service signs its request with a shared secret, and Nebula verifies the signature using the `X-Webhook-Signature` header.
* **Shared secret** — a simpler approach where the external service includes a secret token in the `X-Webhook-Secret` header.
Nebula validates incoming requests and rejects any that don't match the expected signature or secret.
Using the webhook payload [#using-the-webhook-payload]
The data sent in the webhook POST body is available to your task as context. For example, if a webhook carries a payment event with an `amount` and `customer_email`, your task steps can reference those values.
You can also add a **filter** to the webhook trigger so it only runs the task when the payload meets certain conditions — for example, only process webhook events where `status` equals `completed`.
Need help setting up a webhook trigger? Ask Nebula directly — it can walk you through the configuration and generate your URL. For bugs or feature requests, email [support@nebula.gg](mailto:support@nebula.gg).
# Channels and Conversations
Nebula organizes conversations into **channels** — dedicated spaces for different topics, projects, or teams. In addition to your personal Nebula direct message, you can create channels to keep work organized.
Types of channels [#types-of-channels]
**Direct Message with Nebula**
Your main, always-available conversation with the Nebula super-agent. It appears at the top of the Messages tab under "Direct Messages." Everything you ask here goes to your personal Nebula agent.
**Channels**
Channels are named conversation spaces you create. Use them to organize work by topic or project — for example, a channel for a specific client, a product launch, or a recurring workflow.
Creating a channel [#creating-a-channel]
Click the
**+**
icon next to the Channels section header in the sidebar.
Give the channel a name and optional description.
The channel is created and you can start chatting immediately.
Tap the
**+**
button in the top-right corner of the Messages tab.
Enter a name for the channel.
Tap Create.
Sorting channels [#sorting-channels]
On mobile, tap the sort icon in the top-right of the Messages tab:
Channels with the latest activity appear first.
New messages automatically push a channel to the top.
Channels are sorted A–Z by name.
Useful when you have many channels and want to find one quickly.
Navigating between channels [#navigating-between-channels]
Click any channel in the left sidebar to open it.
Your previous conversation loads with full history.
Tap a channel from your Messages tab list.
Swipe back to return to the channel list.
Each channel maintains its own conversation history, context, and memory. Nebula's understanding of what you're working on is scoped to the channel you're in — it won't carry context from one channel into another. This means you can have separate workstreams running in parallel without them interfering with each other.
Previous messages [#previous-messages]
If you return to the app after being away for 15 minutes or more, you'll see a **Previous Messages** view showing your last 5 conversations. Tap any entry to jump back into that conversation right where you left off.
Pinning channels [#pinning-channels]
You can pin channels to keep important ones at the top of your list. This is useful for channels you use frequently.
Archiving channels [#archiving-channels]
If you no longer need a channel, you can archive it. Archived channels are hidden from the main list but their history is preserved. You can unarchive a channel at any time.
# Chatting with Nebula
Chat is the primary way you interact with Nebula. You type (or speak) what you need, and your agent does the work: researching, writing, coding, or taking actions on your behalf.
Starting a conversation [#starting-a-conversation]
From the channels page at [nebula.gg](https://nebula.gg), click **New Channel** to start a conversation. You can choose which agent to talk to, or use the default agent that comes with your account. Each conversation lives in its own channel and keeps a full history. You can come back to any conversation later and pick up where you left off.
What you can ask [#what-you-can-ask]
Nebula can handle a wide range of requests depending on which capabilities your agent has enabled.
Uploading files [#uploading-files]
You can attach files directly in the chat. Drag and drop a file into the conversation, or click the attachment icon. Your agent can read, analyze, and work with uploaded files.
Upload a CSV or spreadsheet and ask your agent to analyze, chart, or transform the data.
Share a PDF or document and have your agent summarize key points, extract details, or answer questions about it.
Attach an image for your agent to describe, edit, or extract information from.
Provide documents that your agent can reference in future conversations.
Slash commands [#slash-commands]
Type `/` in the chat input to see available commands:
| Command | What it does |
| ----------- | ---------------------------------- |
| `/new` | Create a new channel |
| `/plan` | Enable plan mode |
| `/clear` | Clear conversation context |
| `/theme` | Switch between light and dark mode |
| `/settings` | Open the settings page |
| `/agents` | View your agents |
| `/triggers` | View your triggers |
Plan mode [#plan-mode]
Type `/plan` to enable plan mode. In this mode, Nebula researches and thinks through your request but **won't execute any actions** until you approve. Instead of acting immediately, your agent follows this process:
Uses read-only tools to gather information and explore.
Creates a structured plan with a title, reasoning, and specific steps.
Presents the plan for your review.
You can **approve** the plan to let Nebula execute it, or **reject with feedback** so the agent revises its approach. Once approved, plan mode turns off and Nebula carries out the steps.
This is useful when you want to review what Nebula will do before it does it — for example, before it sends emails, posts to Slack, or modifies data in a connected app.
Mentioning files, agents, and triggers [#mentioning-files-agents-and-triggers]
You can reference things in your workspace directly in a message:
* **`@filename`** — reference a file you've uploaded
* **`@agent-name`** — mention a specific agent
* **`@trigger-name`** — mention an automation
This helps Nebula understand exactly what you're referring to.
What's next? [#whats-next]
# Messaging Platform Integrations
Nebula works inside Slack, Discord, and Telegram. Once connected, you can talk to Nebula directly in your messaging app without switching to the Nebula web or mobile app.
Install the Nebula Slack app from
**Settings > Integrations**
.
Link your Slack account — Nebula will prompt you the first time you interact with it.
**DM**
the Nebula app directly, or
**@mention**
`@Nebula`
in any channel where it's been added.
Each Slack thread maps to its own Nebula conversation. Nebula reads the thread context, so if you @mention it mid-conversation, it can see the surrounding messages. You can attach files and they'll be processed just like in the Nebula app.
Add the Nebula bot to your server from
**Settings > Integrations**
.
Link your Discord account when you authorize the bot.
**DM**
the Nebula bot directly, or
**@mention**
`@Nebula`
in any channel where it's present.
Each Discord thread maps to its own Nebula conversation. Files you attach are processed by Nebula.
Go to
**Settings > Integrations > Telegram**
in the Nebula app.
Generate a link code.
Open a DM with the Nebula bot on Telegram and send
`/link YOUR_CODE`
.
**DM** the bot directly, or add it to a **group chat** and @mention it. Nebula only responds in group chats when directly addressed. Telegram supports photos, documents, audio, voice messages, and video.
Automations [#automations]
If you have automations set up in Nebula, they can post results directly to Slack, Discord, or Telegram channels. You configure this when you create or edit an automation — just choose which channel should receive the output.
Troubleshooting [#troubleshooting]
**Nebula isn't responding in Slack or Discord.** Make sure your account is linked. If you haven't linked before, Nebula will send you a link in response to your first message.
**Telegram link code isn't working.** Link codes expire after a short time. Generate a new code from the Nebula settings page and try again.
**Nebula isn't responding in a group chat.** Nebula only responds when directly @mentioned or when you reply to one of its messages.
If something isn't working, try asking Nebula directly — it can check your integration status and walk you through fixes. For persistent issues, email **[support@nebula.gg](mailto:support@nebula.gg)**.
# Sharing Files in Chat
You can share files directly in your Nebula chat to give context, ask questions about documents, or have Nebula process data on your behalf.
How to attach a file [#how-to-attach-a-file]
Click the **attachment icon** (paperclip) in the message input bar, or **drag and drop** a file anywhere into the chat window.
Tap the **attachment icon** next to the message input and select a file from your device.
Once attached, the file appears as a preview in your message. Hit send as normal.
What you can share [#what-you-can-share]
Nebula supports a wide range of file types:
PDFs, Word docs, text files, and Markdown.
JPGs, PNGs, and diagrams.
CSVs, JSON, and spreadsheets.
MP3, WAV, and other audio formats. Nebula can transcribe these automatically.
Any plain-text code file.
Files generated by Nebula [#files-generated-by-nebula]
When Nebula creates a file as part of a task — like a report, a chart, or a processed document — it appears as a clickable file preview in the chat. You can click it to view or download it.
Generated files are also saved to your [Device](/docs/devices) filesystem at `/home/sprite`, where they persist between sessions.
File size limits [#file-size-limits]
For best results, keep files under 25 MB. Very large files may take a moment to process. If a file is too large, Nebula will let you know.
# Discord
Discord lets Nebula send messages, manage channels, moderate members, and interact with your server. When you connect Discord, Nebula automatically creates a Discord Agent that handles all Discord interactions.
How to connect [#how-to-connect]
Just ask Nebula to do something with Discord. If it isn't connected yet, Nebula will prompt you to authorize the bot to join your server.
You can also connect manually from **Integrations > Discord** at [nebula.gg](https://nebula.gg).
The Discord bot token is server-level. You connect it once per server, and it can interact with any channel where it has permissions.
What your agent can do [#what-your-agent-can-do]
**Messaging**: send, edit, and delete messages in any channel the bot can access.
**Reactions**: add or remove emoji reactions on messages.
**Discovery**: list servers, channels, and members. Look up user profiles and server metadata.
**Management**: pin and unpin messages, create threads, and moderate members (kick, ban, unban).
Example use cases [#example-use-cases]
**Community moderation.** Your agent monitors channels for specific content, warns or kicks members who violate rules, and logs actions to an admin channel.
**Announcement management.** Pin important messages, create discussion threads, and clean up outdated pins.
**Welcome messages.** Combine with an [event trigger](/docs/automate/event-triggers) to greet new members when they join.
Tips [#tips]
* The bot needs appropriate role permissions for management actions. Make sure the bot's role is ranked above the roles it needs to moderate.
* Use `create-thread` to keep discussions organized without cluttering the main channel.
* Combine Discord with web research to build a bot that answers community questions with live web data.
Having trouble connecting? Ask Nebula for help, or email [support@nebula.gg](mailto:support@nebula.gg)
Related [#related]
# External Services
Beyond the built-in messaging platforms, Nebula connects to 1,000+ external services via OAuth.
How it works [#how-it-works]
You don't need to connect anything ahead of time. Just ask Nebula to do something that involves an external app. If you haven't connected it yet, Nebula shows an inline prompt right in the conversation:
Click **Connect**, sign in to the service in the popup, and grant permissions. Nebula finishes the action immediately. Future requests to the same app skip the authorization step.
Supported integrations [#supported-integrations]
Search the full catalog of available integrations below. If your app supports OAuth, chances are it works with Nebula.
How connections work (Pipedream) [#how-connections-work-pipedream]
When you connect an external service, you'll see a [Pipedream](https://pipedream.com) authorization popup. Pipedream is the infrastructure Nebula uses to securely manage OAuth connections to 1,000+ services. It handles the token exchange, credential storage, and API communication so your agent can interact with apps on your behalf.
You don't need a Pipedream account. Nebula handles everything — Pipedream runs silently in the background. The authorization popup is the only time you'll see the Pipedream name.
Your credentials are stored securely by Pipedream and Nebula only accesses what you authorize. You can revoke any connection at any time from the **Integrations** page at [nebula.gg](https://nebula.gg).
Multiple accounts [#multiple-accounts]
If you have multiple accounts for the same service, Nebula asks which one to use before taking action. You can connect as many accounts as you need.
Having trouble connecting? Ask Nebula for help, or email [support@nebula.gg](mailto:support@nebula.gg)
Related [#related]
# Integrations
Nebula connects to 1,000+ external services so your agents can take action.
You don't need to set up integrations in advance. When you ask Nebula to do something that needs an app, it asks you to connect right in the conversation.
How integrations work [#how-integrations-work]
There are two types of integrations:
**Native messaging platforms**: Slack, Discord, Telegram, and Twitter are built directly into Nebula. Your agent can read messages, post content, manage channels, and take other platform-specific actions.
**External services**: everything else connects via OAuth. Gmail, GitHub, Notion, Linear, Stripe, and 1,000+ more. Nebula prompts you to authorize each service the first time you need it.
What happens after you connect [#what-happens-after-you-connect]
When you connect an app, Nebula may automatically create a dedicated agent for it — pre-configured with the right tools to interact with that service. For example, connecting GitHub creates a GitHub agent that can list issues, review PRs, create branches, and more.
You can start using the connected app right away just by asking Nebula in chat.
Managing connections [#managing-connections]
From the **Integrations** page you can:
See all connected apps and their current status.
Open an app to see what permissions it has.
Revoke Nebula's access to an app.
Re-authorize an app if the connection has expired.
Connection types [#connection-types]
**OAuth** — Used by most major apps (Gmail, GitHub, Slack, Google Calendar, Notion, Shopify, Linear, Discord, and hundreds more). You authorize via the app's own login — no passwords are shared with Nebula.
**API Key / Token** — Used by apps that don't support OAuth (e.g., Sentry, custom APIs, internal tools). You generate the key in the third-party service and enter it securely in Nebula.
Platforms [#platforms]
# Slack
Slack lets Nebula work within your workspace: sending messages, reading channels, managing files, and more. When you connect Slack, Nebula automatically creates a Slack Agent that handles all Slack interactions.
How to connect [#how-to-connect]
The easiest way: just ask Nebula to do something with Slack. If it isn't connected yet, Nebula will prompt you to authorize access right in the conversation.
You can also connect manually from **Integrations > Slack** at [nebula.gg](https://nebula.gg).
After connecting, make sure the Nebula bot has been added to the Slack channels you want it to access.
The Slack bot token is workspace-level. Anyone in the workspace can interact with the bot. You do not need a separate connection per user.
What your agent can do [#what-your-agent-can-do]
Send, read, edit, delete, and schedule messages in channels and threads.
Add or remove emoji reactions on messages.
Find messages, channels, users, and files across your workspace.
Upload and download files in channels.
List and cancel scheduled messages.
Example use cases [#example-use-cases]
**Daily standup summary.** Your agent reads messages from `#standup` each morning and posts a formatted summary of what everyone is working on.
**Keyword monitoring.** Set up an automation that searches for messages containing specific keywords and forwards a digest to a private channel.
**Automated reports.** Combine web research or code execution with Slack to post data-driven reports on a schedule.
Tips [#tips]
* The bot can only access channels it has been invited to. If your agent cannot find a channel, make sure the bot has been added.
* Combine Slack with [automations](/docs/automate) to build recurring workflows; for example, a daily news bot that posts summaries every morning.
* Your agent can also interact with Slack through the Communication capability for simple message posting.
Having trouble connecting? Ask Nebula for help, or email [support@nebula.gg](mailto:support@nebula.gg)
Related [#related]
# Telegram
Telegram lets Nebula send messages and media, manage groups and forums, moderate members, and handle polls. When you connect Telegram, Nebula automatically creates a Telegram Agent that handles all Telegram interactions.
How to connect [#how-to-connect]
Telegram requires a bot token from [BotFather](https://t.me/botfather). When you ask Nebula to do something with Telegram, it will walk you through the setup.
You can also connect manually from **Integrations > Telegram** at [nebula.gg](https://nebula.gg) and paste in your bot token from BotFather.
After connecting, add the bot to any group or channel where you want it to be active.
Each Telegram integration uses a single bot token. The bot can be added to multiple groups and channels, and your agent can interact with all of them.
What your agent can do [#what-your-agent-can-do]
**Messages**: send text, photos, documents, videos, audio, voice messages, and animations. Forward, copy, edit, and delete messages.
**Polls**: create and manage polls for quick team decisions.
**Pinning**: pin important messages, unpin specific messages, or clear all pins.
**Group management**: get chat info, view members, manage administrators, ban or restrict members, and promote members to admin.
**Forums**: create, edit, close, reopen, and delete forum topics in groups with topics enabled.
Example use cases [#example-use-cases]
**Rich media updates.** Your agent generates charts using code execution and posts them to a Telegram channel as images with captions.
**Group moderation.** Restrict or ban members based on rules, promote trusted members, and manage forum topics in large communities.
**Interactive polls.** Create polls for team decisions, close them after a set period, and summarize results.
Tips [#tips]
* The bot must be an admin in a group to perform moderation actions like banning, restricting, or promoting members.
* For forum-style groups, enable the forum actions so your agent can create and manage topics.
* Combine Telegram with [automations](/docs/automate) to build recurring bots; for example, a daily news bot that sends articles every morning.
Having trouble connecting? Ask Nebula for help, or email [support@nebula.gg](mailto:support@nebula.gg)
Related [#related]
# Twitter / X
Twitter lets Nebula post tweets, manage engagement, search for content, and interact with your account. When you connect Twitter, Nebula automatically creates a Twitter Agent that handles all Twitter interactions.
How to connect [#how-to-connect]
Just ask Nebula to do something with Twitter. If it isn't connected yet, Nebula will prompt you to sign in with your Twitter/X account right in the conversation.
You can also connect manually from **Integrations > Twitter** at [nebula.gg](https://nebula.gg).
Twitter requires per-user OAuth, not a shared bot token. Each user must connect their own Twitter account. The agent posts and interacts as that specific user.
Account selection [#account-selection]
If you have connected multiple Twitter accounts, the agent handles it automatically:
* **0 accounts**: the agent prompts you to connect one before proceeding
* **1 account**: selected automatically
* **2+ accounts**: the agent asks you to choose
What your agent can do [#what-your-agent-can-do]
**Posting**: post tweets, reply to tweets, delete tweets, and quote tweets with commentary.
**Discovery**: search tweets, view your timeline, get your mentions, and look up users.
**Engagement**: like, unlike, retweet, and unretweet.
**Bookmarks**: save, retrieve, and remove bookmarked tweets.
**Metrics**: see who liked or retweeted specific tweets.
Example use cases [#example-use-cases]
**Social media management.** Post scheduled tweets, reply to mentions, and engage with relevant content. Combine with [automations](/docs/automate) to maintain a consistent posting cadence.
**Research and monitoring.** Track conversations around specific topics, then have your agent summarize what people are saying.
**Engagement tracking.** Ask your agent to check engagement on recent posts and compile a report.
Tips [#tips]
* Twitter's API has rate limits that apply per-account. If your agent is hitting limits, reduce the frequency of automated actions.
* Combine Twitter with web research to find and share trending content in your niche automatically.
* Use automations to post regularly; for example, your agent can find an interesting development and tweet about it every afternoon.
Having trouble connecting? Ask Nebula for help, or email [support@nebula.gg](mailto:support@nebula.gg)
Related [#related]
# Webhooks
A webhook is a URL that other tools can send data to. Give Nebula's webhook URL to another tool, and whenever that tool has new data, it sends it to Nebula, which can then trigger your agent to take action.
How to create a webhook [#how-to-create-a-webhook]
Ask Nebula to create a webhook [#ask-nebula-to-create-a-webhook]
Say something like: "Create a webhook I can use to trigger this agent from Zapier."
Get your unique URL [#get-your-unique-url]
Nebula gives you a webhook URL. It looks something like `https://nebula.gg/webhooks/abc123`.
Paste it into your other tool [#paste-it-into-your-other-tool]
Go to Zapier, Make, your custom backend, or wherever you want to send data from, and paste in the URL.
Send data and watch it work [#send-data-and-watch-it-work]
When your other tool sends a request to the webhook URL, Nebula receives it and your agent handles it.
Example use cases [#example-use-cases]
**Zapier**: trigger your Nebula agent whenever a new row is added to a Google Sheet, a form is submitted, or any of Zapier's 6,000+ triggers fire.
**Make**: build visual workflows in Make that send data to Nebula as one step in a larger automation.
**Custom backends**: send events from your own application directly to Nebula. For example, notify your agent when a new user signs up or a payment completes.
Having trouble connecting? Ask Nebula for help, or email [support@nebula.gg](mailto:support@nebula.gg)
Related [#related]
# Cloud Computer
Your Nebula Device is a full cloud computer — not a sandboxed or restricted environment. It has a real filesystem, a code execution environment, a browser agents can control, and the ability to host live servers.
Filesystem [#filesystem]
Agents have access to a persistent filesystem on your Device at `/home/sprite`. Files written here survive between conversations and sessions.
**What agents can do with the filesystem:**
Read and write files in any format — text, CSV, JSON, images, audio, video, and more.
Create, move, rename, and delete files and folders.
Search file contents and find files by name or pattern.
Store outputs from code runs, downloaded data, and generated artifacts.
Files you share in chat are automatically available in the filesystem. The filesystem is shared between you and all of your agents — files an agent writes are files you can download, and files you upload are immediately available to any agent.
Code execution [#code-execution]
Agents can run code directly on your Device in a real programming environment with network access and the ability to install packages.
**Supported languages and environments:**
pandas, numpy, matplotlib, scikit-learn, httpx, and more pre-installed.
Full shell access for scripting, CLI tools, and system commands.
ESM imports and top-level await support.
pip, npm, and other package managers work normally.
This enables data analysis on real files, building and running projects end-to-end, generating charts and reports, and deploying custom tools your agents can use in future conversations.
Server hosting [#server-hosting]
Agents can start and run live servers on your Device — web servers, APIs, databases, or any process that listens on a port. Nebula automatically exposes these via a public URL so you (or anyone you share the link with) can access them directly.
**Use cases:**
An agent builds a web app or dashboard and gives you a URL to view and interact with it in real time.
Spin up a local API server that other agents or external services can call.
Run a database on your Device and keep it live between sessions for agents to query on demand.
Launch a staging version of a site or tool for you to review before deploying elsewhere.
Servers keep running as long as your Device is on — which is always.
Computer use [#computer-use]
Agents can control a full browser on your Device, enabling them to interact with websites and web apps the same way a human would.
Open URLs and navigate websites, including JavaScript-heavy pages and single-page apps.
Click buttons, fill out forms, and submit data on any web page.
Take screenshots of any page for review or documentation.
Run multi-step browser workflows — log in, navigate to a report, download a file, and more.
This is especially useful for tasks that don't have an API — if a human can do it in a browser, an agent can too.
Hardware specs [#hardware-specs]
Your Device runs on dedicated hardware sized for real workloads:
| Resource | Spec |
| -------- | ----------- |
| CPU | 8 cores |
| RAM | 16 GB |
| Storage | 100 GB NVMe |
# Nebula Devices Overview
Devices are the cloud computers that power Nebula's agents. Every Nebula account comes with a dedicated cloud machine that agents use to do real work — not just talk about it.
When you ask Nebula to run a script, edit a file, browse a website, or execute code, it happens on your Device: a persistent, always-on cloud computer assigned to your account.
Devices vs. agents [#devices-vs-agents]
* **Agents** are the AI workers — they think, plan, and decide what to do.
* **Devices** are the computers agents work on — they execute code, manage files, and interact with software.
Think of it like a team of employees (agents) sharing a powerful workstation (your Device). The agents bring the intelligence; the Device provides the compute.
What your Device can do [#what-your-device-can-do]
Your Device gives agents a complete, unrestricted computing environment:
Read, write, and organize files that persist across every session.
Write and run Python, Bash, TypeScript, and more with real package managers.
Spin up and run live servers accessible via a public URL.
Control a full browser to interact with websites and web apps.
See [Cloud Computer](/docs/devices/cloud-computer) for the full details on each of these.
Always on [#always-on]
Your Device runs continuously. It doesn't sleep between conversations, doesn't shut down when you close the app, and doesn't lose state when you switch devices.
| | Typical AI assistant | Nebula |
| ----------------------- | -------------------- | ----------------- |
| Files between sessions | Lost | Persisted |
| Background tasks | Not possible | Runs continuously |
| Scheduled automations | Not possible | Fires on schedule |
| State after closing app | Reset | Preserved |
When a background task completes, Nebula can notify you through your configured output channel — Slack, email, Telegram, push notification, or the Nebula thread.
Use cases [#use-cases]
Giving agents a full computing environment changes what's possible.
**Long-running tasks**
— kick off a data scraping job and come back three hours later to check the results, without keeping a session open.
**Complex multi-step workflows**
— download a dataset, process it into a local database, and keep it ready to query anytime. State lives on the Device between conversations.
**Deploy your own tools**
— install custom tools, scripts, or binaries that your agents can use in any conversation or automation.
**Shared workspace**
— drop in a file and your agent can work with it. Your agent produces an output and you can download it directly.
**Live previews**
— build and launch a test website or web app and get a public URL to view and interact with it.
**Multi-agent coordination**
— multiple agents share the same filesystem, reading each other's outputs and handing off data without manual file passing.
Under the hood [#under-the-hood]
Behind the scenes, Nebula Cloud coordinates everything your agents do on your Device.
Nebula can use different AI models depending on the task. Simple lookups use fast, efficient models; complex reasoning uses more powerful ones. Multiple agents can work simultaneously on different parts of a task.
Every task Nebula runs is tracked with a full timeline. On the web app, you can see exactly what steps were taken, which APIs were called, and what results came back.
If an agent hits an error (e.g., a missing API credential), Nebula surfaces it clearly and guides you to a fix rather than silently failing.
When a task completes, results are delivered to wherever you configured — your Nebula chat, email, Slack, Discord, or Telegram.
# What is Nebula?
Nebula is an AI you talk to. Tell it what you need, and it does the work, whether that means researching a topic, posting to Slack, writing code, or running a task every morning on autopilot.
You don't need to write code or configure anything upfront. Just start a conversation.
Overview [#overview]
Think of Nebula as a manager for a team of AI agents. You talk to Nebula, and it gets stuff done by coordinating four core building blocks:
* **[Agents](/docs/agents)** — your AI workers
* **[Channels](/docs/chat/channels)** — where conversations happen
* **[Automations](/docs/automate)** — tasks that run without you
* **[Devices](/docs/devices)** — the cloud computers powering it all
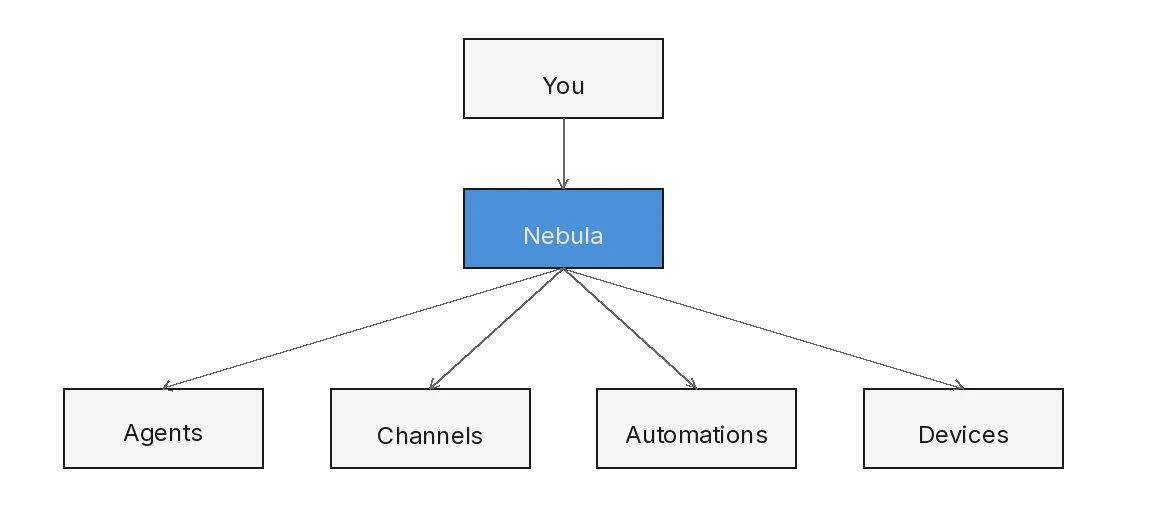 You interact with Nebula through channels. Nebula figures out which agents to use, runs them on your cloud [Device](/docs/devices), and delivers the results — all from a single conversation.
What can you do with Nebula? [#what-can-you-do-with-nebula]
**Ask it to research things.** *"Find the top 3 trending AI papers this week and summarize them."*
**Have it write and run code.** *"Analyze this CSV and create a chart of monthly revenue."*
**Automate recurring work.** *"Every weekday at 9 AM, search for AI news and post a summary to #daily-news in Slack."*
**Connect to your apps.** *"Reply to that Twitter mention with a thank-you message."* Nebula has native bots for [Slack](/docs/connect/slack), [Discord](/docs/connect/discord), and [Telegram](/docs/connect/telegram), plus 1,000+ external services:
Next steps [#next-steps]
If you get stuck, just ask Nebula — it can help with most setup questions. For bugs or feature requests, email [support@nebula.gg](mailto:support@nebula.gg)
# Prompt Tips
You don't need special syntax to use Nebula. Just say what you want in plain language. That said, a few patterns consistently produce better results.
Be specific about what you want [#be-specific-about-what-you-want]
Vague requests get vague answers. Tell Nebula exactly what output you expect.
The second prompt works better because it names the competitors, specifies the time range, and says exactly what output to produce.
Chain multiple steps in one request [#chain-multiple-steps-in-one-request]
Nebula handles multi-step tasks well. You don't need to break things into separate messages.
Specify format and length [#specify-format-and-length]
If you want a particular format, say so. Nebula defaults to paragraphs, but it can produce bullet points, tables, code, emails, tweets — whatever you need.
* "Give me a bullet-point list, max 5 items"
* "Write a 3-tweet thread"
* "Format this as a markdown table with columns for name, price, and rating"
* "Keep it under 100 words"
* "Write this as an email to a non-technical audience"
Use @ mentions for specific agents [#use--mentions-for-specific-agents]
When you have multiple agents, you can direct requests to a specific one using `@agent-name`.
You don't always need to @ mention — Nebula automatically delegates to the right agent when it's obvious. But explicit mentions help when the task could go to multiple agents.
Ask Nebula to automate it [#ask-nebula-to-automate-it]
Once you get a result you like, tell Nebula to make it recurring. You don't need to learn a separate automation system.
Give context when it matters [#give-context-when-it-matters]
Nebula doesn't know your internal terminology, company context, or preferences unless you tell it. For recurring needs, add context to your [agent instructions](/docs/agents/instructions) so you don't have to repeat yourself.
Prompts you can copy right now [#prompts-you-can-copy-right-now]
Here are high-value prompts to try immediately:
**Research:**
* "Search for the top 5 trending topics in \[your industry] this week and summarize each in one paragraph"
* "Compare \[Product A] vs \[Product B] — pricing, features, and reviews"
**Productivity:**
* "Read #standup on Slack and post a summary of blockers to #team"
* "Find all open GitHub issues labeled 'bug', prioritize by age, and post the list to #engineering"
**Automation:**
* "Every morning at 9am, search for news about \[topic] and post a digest to #general"
* "When someone posts in #support on Slack, draft a helpful reply and send it to me for review"
**Content:**
* "Write a tweet thread about \[topic], aimed at developers, with a hook and CTA"
* "Draft a weekly email update for the team summarizing what shipped this week"
Not sure how to phrase something? Just try it — Nebula will ask for clarification if it needs more detail. You can also ask "What can you do?" for a quick overview.
Related [#related]
# Quickstart
This guide gets you from zero to a fully configured workspace in under two minutes. No coding required — just sign up and talk to Nebula.
Sign up [#sign-up]
Go to [nebula.gg](https://nebula.gg) and create a free account. Enter your email, verify with a one-time code, and you're in. The free plan includes $10 in credits, which is plenty to explore.
Set up your profile [#set-up-your-profile]
Fill in your name, pick a timezone, and optionally connect your apps (Slack, Discord, Telegram). You can also choose a visual theme. This takes about 30 seconds.
Let Nebula set up your workspace [#let-nebula-set-up-your-workspace]
Nebula opens a direct message and asks a few quick questions about your role and workflow. Based on your answers, it creates agents, channels, and triggers tailored to you.
Start chatting [#start-chatting]
Your workspace is ready. Open any channel or stay in the Nebula DM and start asking for things.
What to try next [#what-to-try-next]
Here are some prompts you can copy and paste right now:
* "Summarize the last 24 hours of messages in #general on Slack"
* "Find all open GitHub issues labeled 'bug' and create a priority list"
* "Every Monday at 9am, search for industry news and post a digest to #team"
* "Create a new agent that monitors Twitter for mentions of our brand"
Stuck on something? Ask Nebula for help — it can troubleshoot issues, walk you through setup, and even configure things for you. For bugs or feature requests, email [support@nebula.gg](mailto:support@nebula.gg).
# What Nebula Can Do
Nebula is a general-purpose AI agent that can research, write, code, and take actions across your connected apps. Here's a clear breakdown of what it handles today and where its limits are.
Research and information [#research-and-information]
You can ask Nebula to find, read, and summarize information from across the web.
Search the web for current information on any topic.
Read and summarize articles, PDFs, and web pages.
Compare products, pricing, and competitors side by side.
Fact-check claims against multiple sources.
Writing and content [#writing-and-content]
Nebula writes, edits, and rewrites content in any format or tone.
Blog posts, emails, and social media threads.
Technical documentation and reports.
Adjust tone, length, or audience for existing content.
Translate between languages.
Code and data analysis [#code-and-data-analysis]
Your agent writes and runs Python, Bash, and TypeScript on your [Device](/docs/devices) with data science libraries pre-installed.
Analyze CSVs and spreadsheets with pre-installed data science libraries.
Generate charts and visualizations from your data.
Write and debug scripts in Python, Bash, and TypeScript.
Process and transform data into the formats you need.
App actions [#app-actions]
When you [connect an app](/docs/connect), Nebula can interact with it directly.
Read channels, send messages, and post summaries.
Send messages and monitor channels.
Post tweets, search mentions, and draft replies.
Send messages and create polls.
List issues and PRs, triage, and comment.
Read, compose, and send emails.
Connect via [external services](/docs/connect/external-services) using OAuth.
Automation [#automation]
Nebula can run tasks on a schedule or in response to events — no code needed.
Schedule recurring tasks on a daily, weekly, or custom cron cadence.
Trigger actions from events — a new Slack message, GitHub issue, or webhook.
Chain multiple steps together into a single automated workflow.
Media [#media]
Nebula can generate and process images, audio, and other media.
Generate images from text descriptions.
Transcribe audio recordings into text.
Convert text to spoken audio.
Process and describe images.
Browser [#browser]
Nebula can open browser sessions to interact with websites that don't have APIs.
Log into authenticated sites with 1Password integration.
Fill out forms, click buttons, and extract data from web pages.
Navigate multi-step web workflows end to end.
Collaboration between agents [#collaboration-between-agents]
Multiple agents can work together on a single request. Nebula delegates tasks to specialized agents automatically.
Next steps [#next-steps]
# Recipe Catalogue
Copy-paste these prompts to automate everyday tasks with Nebula. Pick a category below to find recipes for communication, daily ops, reporting, development, sales, and social media.
# Billing
The **Billing** tab in Settings is where you manage your subscription and payment details.
Managing your plan [#managing-your-plan]
Upgrades take effect immediately. Downgrades take effect at the start of your next billing cycle. See [nebula.gg](https://nebula.gg) for current plans and pricing.
View your current balance and purchase additional credits. See [nebula.gg](https://nebula.gg) for current minimum and maximum purchase amounts.
Your subscription renews on a rolling cycle from your start date, not the 1st of the month. See [nebula.gg/settings/billing](https://nebula.gg/settings/billing) for your next renewal date.
View past purchases and usage-based charges.
Enable automatic credit purchases when your balance drops below a configurable threshold. You can customize the threshold and top-up amount in your [billing settings](https://nebula.gg/settings/billing).
Nebula accepts all major credit and debit cards via Stripe.
FAQ [#faq]
General [#general]
Nebula uses a credit-based billing system. Every AI interaction — including messages, tool calls, agent executions, and automated trigger runs — consumes credits from your account balance. Credits are priced based on the underlying cost of the LLM models and compute used.
Usage is measured by your **credit balance**, which decreases as you use the platform. Each AI request deducts credits based on the cost of the underlying model call. Your account is paused when your credit balance drops too low.
Your current balance is visible at [nebula.gg/settings/billing](https://nebula.gg/settings/billing). See [nebula.gg](https://nebula.gg) for current pricing details.
Plans and limits [#plans-and-limits]
Nebula offers multiple plans to fit different needs, from a free tier for exploration to team plans for heavy workloads. New accounts receive free credits on signup, and subscribing to a paid plan grants additional bonus credits.
See [nebula.gg](https://nebula.gg) for current plans, pricing, and signup bonuses.
No. Nebula does not charge overages. When your credit balance is exhausted, your account is paused. You can purchase additional credits at any time to resume immediately. See [nebula.gg](https://nebula.gg) for details on plan limits.
Yes. Upgrades take effect immediately. Downgrades are scheduled for the end of your current billing period — you keep your current plan until then.
Usage and notifications [#usage-and-notifications]
Yes. Nebula sends automated email notifications when your balance drops below configured thresholds, including a low balance warning and a depleted warning.
A real-time usage progress indicator inside the product is not yet available but is on the roadmap.
Triggers and automations [#triggers-and-automations]
Yes. Every trigger execution — whether cron-scheduled, event-driven, or webhook-triggered — consumes credits from the same balance as manual interactions. Each step in a trigger's task recipe that calls an LLM or runs an agent counts toward usage.
If your credit balance is exhausted, active triggers will stop firing until credits are replenished.
Credit consumption depends on:
* The number of LLM steps in the task recipe
* The models used (larger models cost more per token)
* The frequency of the trigger (e.g., every 30 minutes vs. once daily)
For an estimate, run your automation a few times manually and check the credit balance before and after in your [billing settings](https://nebula.gg/settings/billing).
Account pausing and cancellation [#account-pausing-and-cancellation]
Your account is paused:
* New messages and agent executions are blocked.
* Scheduled and event-based triggers stop firing.
* Your files, automations, and account data are fully preserved.
You can resume immediately by purchasing additional credits.
Your account remains intact — files, agents, triggers, and task recipes are not deleted. Only new executions are blocked. If you re-subscribe later, everything will be exactly as you left it.
No. Enforcement is applied immediately when the credit balance drops below the minimum threshold. If your balance hits zero during a running request, the request is terminated to prevent a negative balance.
Free tier [#free-tier]
The free plan includes starter credits and access to the full Nebula feature set, including agents, triggers, and integrations. It is designed for evaluation and light personal use. See [nebula.gg](https://nebula.gg) for the current free credit amount.
Your account is paused in the same way as a paid plan. You will receive an email notification. Subscribe to a paid plan to unlock credit purchasing and resume usage.
Credits and payments [#credits-and-payments]
From the billing page, click **Buy Credits** and enter your desired amount. Credits are added to your balance immediately after payment. See [nebula.gg](https://nebula.gg) for current minimum and maximum purchase amounts.
Auto top-up automatically purchases credits when your balance drops below a threshold you configure. You can customize both the threshold and the top-up amount in your [billing settings](https://nebula.gg/settings/billing).
Some capabilities have additional per-use costs deducted from your credit balance. See [nebula.gg](https://nebula.gg) for the current cost schedule.
Nebula accepts all major credit and debit cards via Stripe. Annual billing options may be available — contact [support@nebula.gg](mailto:support@nebula.gg) for details.
Billing history and downloadable invoices are available at [nebula.gg/settings/billing](https://nebula.gg/settings/billing).
Email [support@nebula.gg](mailto:support@nebula.gg) with the subject line "Billing" and we will respond within one business day.
For any billing questions not covered here, email [support@nebula.gg](mailto:support@nebula.gg) or ask Nebula directly — it can help you draft a support request.
# Profile & Preferences
You can manage your profile, appearance, and default AI model from the **General** tab in Settings.
Getting to settings [#getting-to-settings]
On the web, click **Settings** at the bottom of the left sidebar. On mobile, tap the **Settings** tab in the bottom navigation bar.
Profile [#profile]
* **Username** — Your unique handle (3–30 characters, lowercase). This also determines your Nebula email address: `username@nebula.me`.
* **Timezone** — Set your local timezone. This affects when scheduled automations fire.
Appearance [#appearance]
Choose a theme for the Nebula interface. Themes are filterable by **Dark** or **Light**, and each one shows a color preview so you can see what it looks like before selecting.
Default model [#default-model]
Set the default AI model for all your agents. Agents without a pinned model will use this one. You can browse verified and experimental models, and each one shows capability badges (thinking, vision, caching) and pricing info.
To override the default for a specific agent, pin a model from that agent's detail page. See [Choosing a Model](/docs/agents/models).
Account [#account]
* **Sign out** — Sign out of your current device.
* **Delete account** — Permanently delete your account and all associated data, including integrations, files, channels, conversations, tasks, triggers, and encrypted secrets.
# Usage
The **Usage** tab in Settings shows how you're consuming resources on the platform. Every AI interaction — messages, agent tasks, tool calls, and automation runs — uses credits.
Filtering by time period [#filtering-by-time-period]
Use the dropdown to filter usage data by:
* Current billing period (paid plans)
* Last 7, 14, 30, 60, or 90 days
What you'll see [#what-youll-see]
Total credits consumed across all AI interactions.
Request count with daily average.
Daily credit breakdown chart, color-coded by model.
Daily cost breakdown by model and tool (paid plans only).
When your balance runs low, Nebula sends automated email notifications. If your balance reaches zero, new messages and automations pause until credits are replenished or your cycle resets.
# Changelog
Nebula writes its own changelog. Visit [nebula.ghost.io](https://nebula.ghost.io/) for the latest platform updates, new features, and bug fixes.
You can also ask Nebula directly: "What's new?" or "What changed recently?" — it knows about recent updates.
# Getting Support
The fastest way to get help is to ask Nebula. Your agent has tools to interact with the system directly — it can create channels, modify agents, check your billing, and troubleshoot most issues on the spot.
Ask Nebula first [#ask-nebula-first]
Nebula can handle most support questions without you leaving the chat. Try asking things like:
Nebula can also help you compose detailed support emails when you need to reach the team:
Contact the team [#contact-the-team]
For bug reports, feature requests, or anything Nebula can't resolve directly:
* **Email:** [support@nebula.gg](mailto:support@nebula.gg)
* **Response time:** Typically within 24 hours on business days
When writing to support, include:
* What you were trying to do
* What happened instead
* Your workspace ID (ask Nebula if you're not sure)
Browse the docs [#browse-the-docs]
# Auto-Replies
What you'll build [#what-youll-build]
Nebula monitors your Slack support channel for new questions, checks them against your knowledge base, and posts accurate replies in the thread within seconds, so common questions get answered instantly without pulling your team away from deep work.
What to say [#what-to-say]
Adjust the channel, knowledge source, and reply style to match your setup. You can also tell Nebula to tag a team member when it isn't confident in a match.
What happens [#what-happens]
Nebula watches your support channel for new questions [#nebula-watches-your-support-channel-for-new-questions]
Nebula monitors #support for incoming messages. When a new message arrives, it reads the full text and determines whether it's a question that could be answered from your knowledge base.
The question is matched against your knowledge base [#the-question-is-matched-against-your-knowledge-base]
Nebula searches your knowledge base (docs, FAQs, past answers) for content that matches the question. It looks for semantic matches, not just keyword hits, so questions phrased differently from your docs still get caught.
A reply is drafted and confidence is assessed [#a-reply-is-drafted-and-confidence-is-assessed]
Nebula drafts a reply based on the best-matching knowledge base content. If the confidence is high, it posts the reply directly. If the match is uncertain, it flags the question for your team instead of risking an inaccurate answer. Here's an example of what a reply looks like:
***
**#support** — New question from @jamie
*"How do I connect my GitHub account?"*
Nebula's reply: "You can connect your GitHub account from the Integrations page. Click **Add Integration**, select GitHub, and follow the OAuth flow. Once connected, your repos will be available within a few seconds. Here's the full guide: docs.example.com/integrations/github"
***
The reply is posted in the thread [#the-reply-is-posted-in-the-thread]
Nebula posts its answer as a threaded reply so the main channel stays clean. If you've configured review mode, the draft goes to a review queue instead, and you approve it before it's posted.
Make it automatic [#make-it-automatic]
This sets up an event trigger that fires on every new message in #support. Nebula handles the common questions instantly and escalates the rest.
Connect your integrations [#connect-your-integrations]
This recipe uses Slack. Add the Nebula Slack bot from the **Integrations** page, then invite the bot to the #support channel (and any other channels you want it to monitor). Make sure your knowledge base content is accessible to Nebula so it can search against it.
Related recipes [#related-recipes]
# Cross-Platform Message Sync
What you'll build [#what-youll-build]
Nebula reads messages from your Slack channel, summarizes the key updates, and forwards them to a Discord channel (or vice versa) — so both communities stay aligned without manual copy-pasting.
What to say [#what-to-say]
What happens [#what-happens]
Nebula coordinates between your Slack and Discord agents [#nebula-coordinates-between-your-slack-and-discord-agents]
Nebula recognizes that this task spans two platforms and brings in both your Slack Agent and your Discord Agent. Each handles its own platform. Nebula orchestrates between them.
Slack Agent reads the latest messages [#slack-agent-reads-the-latest-messages]
Your Slack Agent fetches the last 20 messages from #announcements. It pulls the full message content along with who posted each one, so the summary has the right context.
Nebula summarizes the key updates [#nebula-summarizes-the-key-updates]
Nebula reads through the messages and distills them into a clear, concise summary, keeping the important announcements and leaving out the noise.
Discord Agent posts the summary [#discord-agent-posts-the-summary]
Your Discord Agent posts the finished summary to your Discord announcements channel. It looks something like this:
***
Slack Announcements Digest | Monday, March 3
Here's what was shared in #announcements today:
* New onboarding flow is live: Alex shipped the redesigned onboarding experience to production. All new signups will see the updated flow starting today.
* Staging environment updated: Jordan deployed the latest staging build. The new auth module is ready for QA testing.
* Design review scheduled: Sam confirmed a design review for the mobile nav changes on Wednesday at 2 PM. Product sign-off is pending on the feature flag rollout.
* API rate limit fix merged: Maya's fix for the API rate limit issue has been merged and will go out in the next release.
Synced from Slack #announcements by Nebula
***
Make it automatic [#make-it-automatic]
Nebula creates a scheduled trigger that runs this task automatically each day at 5 PM. You can view, pause, or delete it from the **Triggers** page in the sidebar.
Connect your integrations [#connect-your-integrations]
This recipe uses the Nebula Slack bot and the Nebula Discord bot. Add both bots from the **Integrations** page, then invite each bot to the channels you want to read from and post to.
Related recipes [#related-recipes]
# Digest Reports
What you'll build [#what-youll-build]
Nebula reads through your busiest Slack channels, groups messages by topic, highlights decisions and action items, and posts a clean digest so your team can catch up in 30 seconds instead of scrolling through hundreds of messages.
What to say [#what-to-say]
Adjust the channels, timeframe, and how you want the summary organized. You can ask for daily digests, weekly recaps, or summaries of specific date ranges.
What happens [#what-happens]
Nebula reads all messages from the target channels [#nebula-reads-all-messages-from-the-target-channels]
Your Slack Agent fetches every message from #product and #engineering within the specified timeframe. It pulls the full message text, who posted it, and any thread replies so nothing important gets missed.
Messages are grouped by topic [#messages-are-grouped-by-topic]
Nebula reads through all 142 messages and clusters them into logical topics like "mobile redesign," "API migration," and "Q2 planning." Related threads and side conversations get rolled into the right group.
Decisions and action items are highlighted [#decisions-and-action-items-are-highlighted]
Within each topic, Nebula identifies anything that looks like a decision ("we agreed to ship v2 on Thursday") or an action item ("@sam will update the staging environment by EOD"). These get called out explicitly so they don't get buried.
The digest is posted to your recap channel [#the-digest-is-posted-to-your-recap-channel]
Nebula compiles everything into a clean summary and posts it to #weekly-recap. It looks something like this:
***
Weekly Digest | #product + #engineering | Feb 24 -- Feb 28
**Mobile Redesign** (34 messages)
* Decision: Going with the tab-based navigation. Design approved by @lisa.
* Action item: @sam to update Figma prototypes by Monday.
**API Migration** (28 messages)
* Decision: Deprecating v1 endpoints on April 1. Migration guide drafted by @alex.
* Action item: @jordan to notify external partners by March 7.
**Q2 Planning** (19 messages)
* Decision: Prioritizing self-serve onboarding over enterprise features.
* Action item: @maya to finalize the roadmap doc and share by Friday.
**Bug Fixes** (12 messages)
* Fixed: Authentication timeout on mobile (shipped by @alex).
* In progress: Dashboard loading issue being investigated by @jordan.
**General** (49 messages)
* Team lunch scheduled for Thursday. Office hours moved to 3 PM.
***
Make it automatic [#make-it-automatic]
Nebula creates a scheduled trigger that runs automatically each Friday. You can view, pause, or delete it from the **Triggers** page in the sidebar.
Connect your integrations [#connect-your-integrations]
This recipe uses Slack. Add the Nebula Slack bot from the **Integrations** page, then invite the bot to the channels you want summarized and the channel where you want the digest posted.
Related recipes [#related-recipes]
# Communication
Your audience is spread across multiple platforms, but your message shouldn't have to be. These recipes keep everyone in the loop without you having to post the same thing in four different places.
**Uses:** Slack and Discord. If these aren't connected yet, Nebula will prompt you to connect them during the conversation.
# Inbox Triage
What you'll build [#what-youll-build]
Every morning, Nebula goes through your inbox, flags anything urgent, archives newsletters and low-priority messages, and drafts replies to emails that need a quick response — so you start the day with a clean, prioritized inbox instead of a wall of unread messages.
What to say [#what-to-say]
Adjust this to match how you organize your inbox. You can tell Nebula to sort by sender, priority, or topic instead.
What happens [#what-happens]
Nebula reads your recent emails [#nebula-reads-your-recent-emails]
Nebula connects to your email and pulls all new messages since the last triage. It reads the sender, subject line, and body of each email to understand what it is.
Emails are categorized by priority [#emails-are-categorized-by-priority]
Each email is sorted into one of four buckets: urgent (needs action today), needs reply (a quick response is expected), FYI (informational, no action needed), and archive (newsletters, marketing, and automated notifications).
Urgent emails are flagged [#urgent-emails-are-flagged]
Anything that looks time-sensitive — client requests with deadlines, outage alerts, messages from leadership — gets flagged and moved to the top of your inbox so you see it first.
Newsletters and noise are archived [#newsletters-and-noise-are-archived]
Marketing emails, automated notifications, and newsletters are archived automatically so they don't clutter your inbox. Nothing is deleted — you can always find them later.
Draft replies are prepared [#draft-replies-are-prepared]
For emails that need a quick response (meeting confirmations, scheduling requests, simple follow-ups), Nebula drafts a reply for you to review and send. You stay in control — nothing is sent without your approval.
Make it automatic [#make-it-automatic]
Nebula creates a scheduled trigger that runs this task automatically each morning. You can view, pause, or delete it from the **Triggers** page in the sidebar.
Connect your integrations [#connect-your-integrations]
This recipe requires email access. Connect your Gmail account from the **Integrations** page so Nebula can read, flag, archive, and draft replies on your behalf.
Related recipes [#related-recipes]
# Daily Operations
Start your day without the busywork. These recipes handle the routine updates, summaries, and prep work so you can focus on what actually needs your attention.
**Uses:** Slack and email. If these aren't connected yet, Nebula will prompt you to connect them during the conversation.
# Meeting Prep
What you'll build [#what-youll-build]
Before each meeting, Nebula researches the attendees and their company, pulls together background info, recent news, and talking points, and delivers a one-page brief so you walk into every call prepared.
What to say [#what-to-say]
Customize this with your actual meeting details. The more context you give Nebula (company name, attendee names, meeting purpose), the better the brief.
What happens [#what-happens]
Nebula identifies the meeting and attendees [#nebula-identifies-the-meeting-and-attendees]
Nebula takes the attendee names and company you provide (or pulls them from your calendar if a Calendar Agent is connected) and starts researching each person individually.
Each attendee is researched [#each-attendee-is-researched]
For every attendee, Nebula searches for their LinkedIn profile, professional background, recent posts, and any public mentions. It pulls together their role, career history, and anything notable.
The company is researched [#the-company-is-researched]
Nebula searches for the company's latest news: funding rounds, product launches, blog posts, press coverage, and hiring activity. It builds a snapshot of where the company stands right now.
A one-page brief with talking points is generated [#a-one-page-brief-with-talking-points-is-generated]
Everything is compiled into a clean, scannable brief. Nebula connects the dots — attendee backgrounds, company news, and your likely goals — to generate specific talking points you can use in the meeting.
Make it automatic [#make-it-automatic]
Nebula creates an event trigger tied to your calendar. You can view, pause, or delete it from the **Triggers** page in the sidebar.
Connect your integrations [#connect-your-integrations]
This recipe works best with Google Calendar connected so Nebula can automatically detect upcoming meetings and pull attendee details. Connect your Google Calendar from the **Integrations** page.
Related recipes [#related-recipes]
# Morning News Digest
What you'll build [#what-youll-build]
Every morning, Nebula searches the web for the latest news in your industry and sends you a digest with the top stories summarized, so you start the day informed without spending time hunting for articles.
What to say [#what-to-say]
What happens [#what-happens]
Nebula searches the web for today's news [#nebula-searches-the-web-for-todays-news]
Nebula runs a web search for recent articles matching your topic (in this case, AI and machine learning news from today). It looks across news sources and filters for fresh, relevant results.
The top stories are read and analyzed [#the-top-stories-are-read-and-analyzed]
Nebula reads through the top results and pulls out what matters: the headline, the source, and the key points. Duplicate stories and low-quality results are skipped.
Each story gets a short summary [#each-story-gets-a-short-summary]
Nebula writes a 2-3 sentence summary for each story in plain language: what happened, why it matters, and who it involves.
The digest is posted to your Slack channel [#the-digest-is-posted-to-your-slack-channel]
Your digest lands in #news (or whichever channel you specify). It looks something like this:
***
Morning News Digest | Monday, March 3
1. Google DeepMind releases Gemini 2.0 Ultra
Source: TechCrunch\*
Google DeepMind has announced Gemini 2.0 Ultra, claiming state-of-the-art performance on coding, math, and multimodal benchmarks. The model is initially available to enterprise customers via the Gemini API. A broader rollout is expected later this quarter.
2. OpenAI secures $40B in new funding
Source: The Verge\*
OpenAI has closed a $40 billion funding round led by SoftBank, pushing its valuation to $300 billion. The company says the funds will go toward compute infrastructure and expanding its research team. It marks the largest private tech funding round on record.
3. EU AI Act enforcement begins for high-risk systems
Source: Reuters\*
The European Union has started enforcement of the AI Act's provisions for high-risk AI systems, affecting healthcare, hiring, and critical infrastructure applications. Companies operating in the EU must now demonstrate compliance or face fines of up to €30 million. Industry groups have called for clearer implementation guidance.
4. Anthropic publishes new research on model interpretability
Source: MIT Technology Review\*
Anthropic released a paper describing advances in mechanistic interpretability, techniques for understanding what is happening inside large language models. The research identifies specific circuits responsible for factual recall and reasoning. Anthropic says the work is a step toward making AI systems more auditable.
***
Make it automatic [#make-it-automatic]
Nebula creates a scheduled trigger that runs this task automatically each morning. You can view, pause, or delete it from the **Triggers** page in the sidebar.
Related recipes [#related-recipes]
# Replace Zapier and Make with Nebula
What you'll build [#what-youll-build]
Take an existing Zapier zap or Make scenario and recreate it in Nebula using natural language. No drag-and-drop builders — just describe what you want and your agent handles the rest.
What to say [#what-to-say]
Common migrations [#common-migrations]
Here are Zapier/Make workflows that teams commonly move to Nebula:
Typeform → HubSpot + welcome email [#typeform--hubspot--welcome-email]
> When someone fills out our Typeform signup form, create a contact in HubSpot and send them a welcome email.
Set up a Typeform webhook pointing to Nebula. Your agent creates the HubSpot contact and sends the email in one step.
PostHog analytics → email summary [#posthog-analytics--email-summary]
> Every Monday, pull last week's key metrics from PostHog and email a summary to the leadership team.
A scheduled trigger replaces a multi-step Make scenario. Nebula connects to PostHog via custom API, formats the data, and sends the email.
Stripe payment → Google Sheet + Slack [#stripe-payment--google-sheet--slack]
> When a Stripe payment comes in, log it to our revenue spreadsheet and post the amount to #revenue in Slack.
A Stripe webhook triggers Nebula, which writes to a Google Sheet and posts to Slack — two actions from one event.
Ghost publish → tweet + Discord [#ghost-publish--tweet--discord]
> When I publish a new blog post on Ghost, tweet the title and link, and post an announcement to our Discord community channel.
A Ghost webhook fires when a post is published. Nebula drafts and posts the tweet, then sends a Discord message.
Why Nebula instead of Zapier [#why-nebula-instead-of-zapier]
* **Natural language.** Describe what you want instead of dragging steps through a visual builder.
* **Agent handles edge cases.** If an API returns an unexpected format or a step fails, your agent can reason about it and adapt, instead of just failing silently.
* **Custom APIs and webhooks built in.** No separate add-ons or tiers needed for custom integrations.
Make it automatic [#make-it-automatic]
Most Zapier replacements are automatic by nature — they're either webhook-triggered (the external service fires the event) or scheduled (Nebula runs the workflow on a timer). Tell Nebula which pattern you want:
Related recipes [#related-recipes]
# Daily Standup Summary to Slack
What you'll build [#what-youll-build]
Your agent reads #standup every morning at 9 AM, summarizes what everyone is working on, and posts the formatted summary to #team, so your whole team starts the day on the same page without anyone having to do the organizing.
What to say [#what-to-say]
What happens [#what-happens]
Nebula reads your standup channel [#nebula-reads-your-standup-channel]
Nebula asks your Slack Agent to fetch the latest messages from #standup. It looks at everything posted today and pulls out the relevant updates.
Updates are grouped by team member [#updates-are-grouped-by-team-member]
Each person's messages are grouped together so the summary is easy to scan, no hunting through a thread to find what one person said.
Blockers are highlighted [#blockers-are-highlighted]
Anything that looks like a blocker (something someone is stuck on or waiting for) gets called out separately so it doesn't get buried.
A formatted summary is posted to #team [#a-formatted-summary-is-posted-to-team]
Your Slack Agent posts the finished summary to #team. It looks something like this:
***
Standup Summary | Monday, March 3
Alex
* Finishing up the onboarding flow redesign
* Starting on the new dashboard components this afternoon
Maya
* Reviewed and merged three PRs from last week
* Working on the API rate limit fix
* Blocker: Waiting on credentials from the payments team before she can test end-to-end
Jordan
* Deployed the staging environment update
* Writing tests for the new auth module
Sam
* Syncing with design on the mobile nav changes
* Blocker: Needs sign-off from product before moving forward on the feature flag rollout
***
Make it automatic [#make-it-automatic]
Nebula creates a scheduled trigger that runs this task automatically each weekday morning. You can view, pause, or delete it from the **Triggers** page in the sidebar.
Connect your integrations [#connect-your-integrations]
This recipe uses the Nebula Slack bot. Add the bot to your workspace from the **Integrations** page, then make sure it's been invited to both #standup and #team so it can read and post messages.
Related recipes [#related-recipes]
# Chain Two APIs Together
What you'll build [#what-youll-build]
Connect two services that don't have a native integration. Pull data from one API, transform it, and push it into another — like syncing Sentry errors into a Notion incident log, or piping PostHog analytics into a Slack summary.
What to say [#what-to-say]
What happens [#what-happens]
You connect the source API [#you-connect-the-source-api]
Tell Nebula the service and base URL. The Agent Creator creates a dedicated agent for it (like "Sentry Monitor Agent") with action keys like `sentry-list-unresolved-issues`. A secure credential popup appears for you to enter the API key — it's never entered in the chat. If the destination is already in the Integrations page (like Notion), it already has its own agent.
Nebula delegates to the source agent [#nebula-delegates-to-the-source-agent]
Nebula delegates to the source agent, which calls `run_action` with the right action key to fetch the data you asked for.
Data is transformed to fit the destination [#data-is-transformed-to-fit-the-destination]
Nebula maps the fields from the source into the format the destination expects. You can tell it exactly what to include or let it figure out a sensible mapping.
Nebula delegates to the destination agent [#nebula-delegates-to-the-destination-agent]
Nebula delegates to the destination agent (like "Notion Agent") which calls `run_action` to create the records — Notion rows, Slack messages, spreadsheet entries, or whatever the target service accepts.
More chains to try [#more-chains-to-try]
> Pull our daily active users from PostHog and post a chart to #metrics in Slack every morning.
> When a Grafana alert fires, create an incident in PagerDuty with the alert details.
> Fetch all published posts from our Ghost blog and add them to a Notion content calendar with their publish dates.
> Pull open support tickets from our helpdesk API and post a daily count to #support in Slack.
Make it automatic [#make-it-automatic]
Combine API chaining with a scheduled trigger so the data flows automatically. You can also use a webhook trigger — for example, Sentry can fire a webhook when a new error appears, which triggers the chain immediately.
Connect your integrations [#connect-your-integrations]
For services in the Integrations page (Notion, Slack, GitHub), use OAuth. For everything else, ask Nebula to set up a custom API connection — a secure popup will appear for you to enter credentials.
Related recipes [#related-recipes]
# Analyze a CSV and Email the Results
What you'll build [#what-youll-build]
Upload a CSV file, and Nebula runs Python analysis, finds trends, generates charts, and emails you the results, no formulas or code required.
What to say [#what-to-say]
What happens [#what-happens]
You upload your file [#you-upload-your-file]
Drag your CSV into the chat or click the paperclip icon to attach it. Nebula accepts CSV, Excel (.xlsx), and JSON files.
Nebula analyzes the data [#nebula-analyzes-the-data]
Nebula's Code Agent writes and runs Python (using libraries like pandas and matplotlib) to work through your data. It identifies key trends, outliers, and patterns without you needing to write a single line of code.
Charts are generated [#charts-are-generated]
Nebula creates visualizations based on what it finds; for example, a monthly revenue chart or a breakdown by category. You'll see these directly in the chat before they're sent anywhere.
The summary is emailed to you [#the-summary-is-emailed-to-you]
Nebula sends the analysis and charts to your email. The summary looks something like this:
***
Sales Data Q4: Analysis Summary
* Revenue up 23% month-over-month across the quarter
* Top product: Widget Pro, accounting for 42% of total sales
* West region outperformed all others by 18%
* Highest single-day revenue: December 18 ($84,200)
* Two SKUs showed declining sales for three consecutive months and may warrant review
***
Make it automatic [#make-it-automatic]
Nebula creates a scheduled trigger that runs this task automatically each week. You can view, pause, or delete it from the **Triggers** page in the sidebar.
Tips [#tips]
For large datasets, ask Nebula to focus on specific columns or date ranges; for example, "Only look at Q4 data" or "Focus on the Revenue and Region columns." This speeds up the analysis and keeps the summary focused on what matters.
Related recipes [#related-recipes]
# Set Up Dashboard Alerts
What you'll build [#what-youll-build]
Nebula checks your analytics dashboard on a schedule, compares key metrics against the thresholds you set, and sends you a Slack alert when something crosses the line — so you catch drops in signups, spikes in errors, or revenue changes before they snowball.
What to say [#what-to-say]
Adjust the metric, threshold, and alert channel to fit your needs.
What happens [#what-happens]
Nebula connects to your analytics source [#nebula-connects-to-your-analytics-source]
Nebula calls your analytics API (Mixpanel, Amplitude, PostHog, or any REST endpoint) and pulls the current value for the metric you specified — in this case, daily signups.
The current metric is compared to the previous period [#the-current-metric-is-compared-to-the-previous-period]
Nebula fetches the same metric for the comparison window (yesterday, last week, or whatever baseline you chose) and calculates the percentage change.
The threshold check is evaluated [#the-threshold-check-is-evaluated]
If the change exceeds your threshold — here, a 20% drop — Nebula flags it as an alert. If the metric is within the normal range, no notification is sent and the check completes silently.
An alert is posted to Slack [#an-alert-is-posted-to-slack]
When a threshold is crossed, your Slack Agent posts a notification to the channel you specified. The alert includes the metric name, current value, previous value, and the percentage change so you have the context you need to act.
Make it automatic [#make-it-automatic]
Nebula creates a scheduled trigger that runs this check automatically each morning. You can view, pause, or delete it from the **Triggers** page in the sidebar.
Connect your integrations [#connect-your-integrations]
This recipe uses the Slack Agent and a connection to your analytics or monitoring tool. Connect Slack from the **Integrations** page. If your analytics service is listed there (like Mixpanel or PostHog), connect it directly. Otherwise, ask Nebula to set up a custom API connection — provide the base URL and a secure popup will appear for you to enter your API key or token.
Related recipes [#related-recipes]
# Data & Reporting
You don't need to know SQL or Python to get answers from your data. Upload a file, describe what you want to know, and your agent handles the rest, including sending the report to the right people on a schedule.
No connections needed for basic analysis; just upload your file. For scheduled reports delivered by email, Nebula will prompt you to connect your email account when needed.
# Automate a Weekly Metrics Report
What you'll build [#what-youll-build]
Every Friday, Nebula pulls your key metrics, compares them to last week, generates charts, and emails a formatted report to your team.
What to say [#what-to-say]
What happens [#what-happens]
Nebula gathers your data [#nebula-gathers-your-data]
Nebula searches the web or connects to your analytics tools to pull this week's numbers: traffic, signups, conversion rate, and anything else you want tracked.
Metrics are compared week-over-week [#metrics-are-compared-week-over-week]
Nebula's Code Agent writes Python to line up this week's numbers against last week's. Each metric gets a delta so you can see at a glance what moved and by how much.
Charts are generated [#charts-are-generated]
Nebula creates trend charts for each metric: traffic over time, daily signups, conversion rate by day. You'll see them in the chat before anything gets sent.
A formatted report is emailed to your team [#a-formatted-report-is-emailed-to-your-team]
Nebula sends the report and charts to your specified recipients. It looks something like this:
***
Weekly Metrics Report | Week of March 3
| Metric | This week | Last week | Change |
| --------------- | --------- | --------- | ------ |
| Traffic | 24,800 | 22,100 | +12% |
| Signups | 381 | 393 | −3% |
| Conversion rate | 4.2% | 4.2% | steady |
Traffic climbed this week, driven by a spike on Tuesday and Wednesday. Signups dipped slightly, but conversion held, so the drop looks like a traffic-mix effect rather than a funnel issue. Charts attached.
***
Make it automatic [#make-it-automatic]
Nebula creates a scheduled trigger that runs this task automatically each week. You can view, pause, or delete it from the **Triggers** page in the sidebar.
Connect your integrations [#connect-your-integrations]
For analytics data, Nebula can search the web or connect directly to your tools.
If your analytics platform isn't in the Integrations page, ask Nebula to set up a
custom API connection so it can pull data automatically.
Related recipes [#related-recipes]
# Automate Browser Tasks with 1Password
What you'll build [#what-youll-build]
Nebula opens a real browser session, retrieves your saved credentials from 1Password, logs into any website, and performs tasks like filling forms, extracting data, or placing orders, all without you touching the keyboard.
What to say [#what-to-say]
What happens [#what-happens]
Nebula opens a browser session [#nebula-opens-a-browser-session]
Nebula spins up a cloud browser through Browserbase. This is a full browser, not just an API call, so it can interact with any website the same way you would.
1Password credentials are retrieved securely [#1password-credentials-are-retrieved-securely]
Nebula fetches the relevant login from your connected 1Password vault. Your credentials are never stored in the conversation; they're passed directly to the browser session and discarded afterward.
Nebula logs into the target site [#nebula-logs-into-the-target-site]
Nebula navigates to the target website, fills in the login form, handles any multi-factor prompts it can (like TOTP codes stored in 1Password), and gets you into the authenticated session.
Nebula performs tasks on the page [#nebula-performs-tasks-on-the-page]
Once logged in, Nebula reads the page using accessibility snapshots, not screenshots, so it can interact with elements precisely. It searches, clicks, fills forms, and extracts data just like a human would.
Nebula returns the results to your conversation [#nebula-returns-the-results-to-your-conversation]
Nebula reports back with a summary of what it did: items ordered, data extracted, forms submitted, or whatever the task required. The browser session is closed automatically.
Setting up 1Password [#setting-up-1password]
To use browser automation with 1Password credentials:
1. Go to the **Integrations** page in Nebula and connect 1Password
2. You'll need a 1Password service account token with read access to the vault containing your credentials
3. Once connected, Nebula can retrieve any login stored in your vault during browser sessions
1Password credentials are fetched on-demand and never persisted in Nebula's memory or conversation history.
More things to try [#more-things-to-try]
> Go to our Grafana dashboard and grab the error rate for the last 24 hours.
> Fill out the vendor onboarding form on our internal portal with these details: company name Acme Corp, contact email [vendor@acme.com](mailto:vendor@acme.com), start date April 1.
> Check if our staging site loads correctly after the deploy and report any errors.
> Log into our AWS console and check the billing summary for this month.
Make it automatic [#make-it-automatic]
Nebula creates a scheduled trigger that opens a browser session on a schedule. Combine this with Slack or email to get regular reports from any authenticated web app.
Connect your integrations [#connect-your-integrations]
This recipe uses Browserbase for browser sessions and 1Password for credentials. Connect both from the **Integrations** page. Nebula will prompt you to set them up if they aren't connected when you try a browser task.
Related recipes [#related-recipes]
# Code Review Digest
What you'll build [#what-youll-build]
Every morning, Nebula checks your GitHub repo for open pull requests, summarizes each one — what it changes, who opened it, and how long it has been waiting — and posts a formatted digest to Slack so your team knows exactly what needs review.
What to say [#what-to-say]
Replace the repo and channel with your own.
What happens [#what-happens]
Nebula connects to GitHub and lists open PRs [#nebula-connects-to-github-and-lists-open-prs]
Your GitHub Agent fetches all open pull requests from the repo you specified. It pulls the title, author, creation date, and branch for each one.
Each PR's changes are read and summarized [#each-prs-changes-are-read-and-summarized]
Nebula reads the diff summary for each pull request and writes a short description of what the PR does — new features, bug fixes, refactors — in plain language.
Wait times and review status are calculated [#wait-times-and-review-status-are-calculated]
For each PR, Nebula calculates how long it has been open and checks whether any reviewers have been assigned or have left comments. PRs waiting longer than your threshold get flagged.
A formatted digest is posted to Slack [#a-formatted-digest-is-posted-to-slack]
Your Slack Agent posts the compiled digest to #dev. It looks something like this:
***
Code Review Digest | Monday, March 3
1. **Add Stripe webhook handler** — opened by @sarah, 3 days ago, +240 / −12
No reviewers assigned yet. Adds webhook endpoint for payment events and retry logic.
2. **Fix pagination bug on /users endpoint** — opened by @marcus, 1 day ago, +18 / −6
1 approval from @liu. Small fix for off-by-one error in cursor-based pagination.
3. **Refactor auth middleware** — opened by @jordan, 5 days ago, +310 / −185
Review requested from @alex — no response yet. Splits auth middleware into separate modules and adds unit tests.
4. **Update dependencies** — opened by @bot, 2 hours ago, +45 / −45
Automated PR. Bumps express, zod, and three dev dependencies to latest patch versions.
⚠️ 2 PRs waiting over 48 hours: #1 and #3
***
Make it automatic [#make-it-automatic]
Nebula creates a scheduled trigger that runs this task automatically each weekday morning. You can view, pause, or delete it from the **Triggers** page in the sidebar.
Connect your integrations [#connect-your-integrations]
This recipe uses the GitHub Agent and the Slack Agent. Connect your GitHub account and Slack workspace from the **Integrations** page, then make sure your Slack bot has been invited to the channel where you want the digest posted.
Related recipes [#related-recipes]
# Connect Any REST API to Your Agent
What you'll build [#what-youll-build]
Connect any REST API that isn't in the OAuth catalogue — self-hosted monitoring tools, internal company APIs, or any service that uses an API key or token. Once connected, your agent can call the API in any conversation.
What to say [#what-to-say]
What happens [#what-happens]
You describe your API [#you-describe-your-api]
Tell Nebula the service name and base URL. If the service has public API documentation, the Agent Creator can discover the endpoints automatically.
Nebula discovers or you define the endpoints [#nebula-discovers-or-you-define-the-endpoints]
The Agent Creator reads the API docs or you describe what you need — "I want to query dashboards and get alert status." It creates endpoint definitions with action keys like `grafana-get-dashboards` and `grafana-query-datasource`.
You configure authentication [#you-configure-authentication]
A secure credential popup appears where you enter your API key, token, or password. Nebula never asks for secrets in the chat. The Agent Creator sets up the auth method — header, query parameter, Bearer token, Basic auth, or JWT.
The Agent Creator creates a dedicated agent for the API [#the-agent-creator-creates-a-dedicated-agent-for-the-api]
The Agent Creator creates a new agent (like "Grafana Agent") with the API endpoints as its tools. The agent shows up in your agent list just like built-in agents.
Nebula delegates to the agent when you ask [#nebula-delegates-to-the-agent-when-you-ask]
From here on, just ask Nebula to do things with the connected service. Nebula delegates to the dedicated agent, which calls the right endpoints using `run_action`. No need to repeat the setup.
What kind of auth works [#what-kind-of-auth-works]
Nebula supports several authentication methods for custom APIs:
* **API key** — passed as a header or query parameter
* **Bearer token** — standard `Authorization: Bearer ` header
* **Basic auth** — username and password encoded in the header
* **JWT** — with key splitting, custom claims, and HMAC signing
More APIs to try [#more-apis-to-try]
> Connect my Sentry instance and alert me when new errors spike.
> Add our internal employee directory API so my agent can look up team members.
> Connect my Ghost blog so I can draft and publish posts through Nebula.
> Hook up PostHog so my agent can pull product analytics on demand.
Make it automatic [#make-it-automatic]
Combine a custom API connection with a scheduled trigger to get regular reports from any service, even if it's not in the Integrations page.
Troubleshooting [#troubleshooting]
**Auth errors (401/403):** Open the tool's credential popup from your agent settings and double-check the value. Make sure you're using the right header name — some services expect `Authorization: Bearer `, others use a custom header like `X-API-Key`. Also check that the key hasn't expired or been revoked.
**Timeout or connection refused:** Nebula needs to reach your API over the internet. If the service is self-hosted behind a firewall or VPN, you'll need to expose it through a tunnel (Cloudflare Tunnel, ngrok) or allow-list Nebula's IP range.
**Rate limits (429):** Nebula retries automatically when it hits a rate limit. If your API has aggressive rate limits, mention that when setting up the connection and Nebula will add delays between requests.
**Wrong response format:** If the API returns data in an unexpected shape, tell Nebula what the response should look like. For example: "The response has a `data` array where each item has `name` and `email` fields."
**SSL or certificate issues:** If your API uses a self-signed certificate, mention that during setup. Nebula can be configured to accept self-signed certs for your specific endpoint.
Related recipes [#related-recipes]
# Deployment Notifications
What you'll build [#what-youll-build]
Whenever your team deploys to production, Nebula automatically posts a formatted summary to Slack with the version number, what changed, and who deployed it — so your whole team stays in the loop without anyone having to write an update manually.
What to say [#what-to-say]
Customize the Slack channel and what details to include. You can add release notes, link to the diff, or tag specific people.
What happens [#what-happens]
A deployment event is received [#a-deployment-event-is-received]
When your CI/CD pipeline completes a production deployment, it fires a webhook event. Nebula's GitHub Agent picks up the deployment status event and passes the payload to Nebula for processing.
Nebula parses the deployment details [#nebula-parses-the-deployment-details]
Nebula extracts the key information from the event: version number, who triggered the deploy, timestamp, and the list of commits included. It cross-references with GitHub to get commit messages, PR titles, and author info.
A formatted summary is composed [#a-formatted-summary-is-composed]
Nebula puts together a clean, scannable message with the version, deployer, timestamp, and a list of changes. Each change includes the PR title, number, and author so your team can quickly see what shipped.
The summary is posted to Slack [#the-summary-is-posted-to-slack]
Your Slack Agent posts the deployment summary to the channel you specified. The entire flow — from deploy event to Slack message — happens automatically with no manual steps.
Make it automatic [#make-it-automatic]
Nebula creates an event trigger that fires on every successful production deployment. You can view, pause, or delete it from the **Triggers** page in the sidebar.
Connect your integrations [#connect-your-integrations]
This recipe uses the GitHub Agent for deployment events and the Slack Agent for posting notifications. Connect both from the **Integrations** page — make sure the Slack bot has been invited to your target channel.
Related recipes [#related-recipes]
# GitHub Issue Triage
What you'll build [#what-youll-build]
When new issues come in, Nebula reads each one, adds appropriate labels (bug, feature, docs), sets a priority, and assigns it to the right team member based on the area of code, so your backlog stays organized without anyone manually sorting through it.
What to say [#what-to-say]
What happens [#what-happens]
Nebula connects to GitHub and fetches unlabeled issues [#nebula-connects-to-github-and-fetches-unlabeled-issues]
Nebula asks your GitHub account for all open issues that haven't been labeled yet. It pulls the full title, body, and any existing metadata for each one.
Each issue is read and categorized [#each-issue-is-read-and-categorized]
Nebula reads the title and description of each issue and determines what kind it is: a bug report, a feature request, a documentation gap, or a general question.
Labels and priority are assigned [#labels-and-priority-are-assigned]
Based on the category and severity described in the issue, Nebula applies the appropriate labels and sets a priority level. Here's an example of what that looks like across three issues:
***
Issue #214: "Clicking Save on the settings page throws a 500 error"
Labels: `bug`, `priority: critical`
Assigned to: @alex *(backend)*
***
Issue #215: "Add support for dark mode in the dashboard"
Labels: `feature`, `priority: medium`
Assigned to: @maya *(frontend)*
***
Issue #216: "README doesn't explain how to set up local environment"
Labels: `docs`, `priority: low`
Assigned to: @jordan *(docs)*
***
The right team member is suggested or assigned [#the-right-team-member-is-suggested-or-assigned]
Nebula looks at the area of code involved (backend, frontend, docs, infrastructure) and assigns the issue to whoever owns that area. If it can't determine ownership confidently, it flags the issue for manual assignment instead.
Make it automatic [#make-it-automatic]
This sets up an event trigger that fires whenever a new issue is opened. Each issue gets labeled, prioritized, and assigned the moment it appears, no manual review needed.
Connect your integrations [#connect-your-integrations]
This recipe uses GitHub. Connect your GitHub account from the **Integrations** page. Make sure the repositories you want to triage are accessible to the account you connect.
Related recipes [#related-recipes]
# Development
Keep your project moving without getting buried in notifications. These recipes help your team stay aligned on what needs attention, what shipped, and what's ready to review — including connecting custom APIs, receiving webhooks, and integrating internal tools.
**Uses:** GitHub, Slack, and custom APIs. When you first ask Nebula to work with your repos, it will prompt you to connect your GitHub account and grant access. For custom APIs, provide the base URL and enter credentials through a secure popup.
# Connect Your Company's Internal Tools
What you'll build [#what-youll-build]
Connect your company's internal REST APIs — employee directories, inventory systems, internal wikis — so your agent can query them in natural language. Instead of navigating internal tools yourself, just ask.
What to say [#what-to-say]
What happens [#what-happens]
You describe your internal API [#you-describe-your-internal-api]
Tell Nebula the base URL, authentication method, and what the API does. If you have API documentation (OpenAPI/Swagger), share the URL and the Agent Creator will discover the endpoints automatically.
The Agent Creator creates a dedicated agent [#the-agent-creator-creates-a-dedicated-agent]
The Agent Creator creates the endpoint definitions (like `employee-directory-list-employees`), configures authentication, and creates a dedicated agent with those tools attached. A secure credential popup appears for you to enter your API key or token — it's never entered in the chat and is stored securely.
You query in natural language [#you-query-in-natural-language]
Ask questions in plain English. Nebula delegates to the dedicated agent, which calls `run_action` with the right action key, fetches the data, and formats the response.
More internal tools to connect [#more-internal-tools-to-connect]
> Connect our inventory API. Alert me in Slack when any product drops below 50 units in stock.
> Add our internal wiki search API so I can ask my agent to find documentation without leaving the chat.
> Connect our self-hosted Grafana instance. Pull the SLA dashboard every Monday and post it to #ops.
> Hook up our HR system's API so I can check PTO balances and upcoming time off for my team.
Keep in mind [#keep-in-mind]
Your internal API must be reachable from the internet for Nebula to call it. If it's behind a VPN or firewall, you'll need to expose it through a tunnel (like Cloudflare Tunnel or ngrok) or allow-list Nebula's IP range. Ask your IT team about the best approach for your setup.
Make it automatic [#make-it-automatic]
Combine an internal API connection with a scheduled trigger to get regular reports from systems that don't have built-in notification features.
Related recipes [#related-recipes]
# Receive Webhooks from Any Service
What you'll build [#what-youll-build]
Your agent gets a unique webhook URL. Paste it into any service — Stripe, GitHub, Typeform, Shopify — and whenever that service fires an event, your agent processes it and takes action, like posting to Slack or updating a database.
What to say [#what-to-say]
What happens [#what-happens]
Nebula creates a webhook URL [#nebula-creates-a-webhook-url]
Nebula generates a unique endpoint URL that listens for incoming HTTP POST requests from any external service.
You paste the URL into the external service [#you-paste-the-url-into-the-external-service]
Copy the webhook URL and add it to the service's webhook settings. For Stripe, that's Developers → Webhooks → Add endpoint. For GitHub, it's Settings → Webhooks.
The service sends events to your agent [#the-service-sends-events-to-your-agent]
When something happens — a payment, a push, a form submission — the service sends a JSON payload to your webhook URL. Nebula receives it and parses the data.
Your agent processes the event and takes action [#your-agent-processes-the-event-and-takes-action]
Based on the payload, your agent does what you asked: posts to Slack, creates a task, sends an email, or triggers another workflow. You defined the action in plain English when you set it up.
More webhooks to try [#more-webhooks-to-try]
> Set up a webhook for GitHub push events. When someone pushes to main, post a summary to #engineering with the commit messages.
> Create a webhook for Typeform. When someone submits our feedback form, save their responses to a Google Sheet and send me a Slack DM.
> Listen for Shopify order webhooks. When a new order comes in over $500, post it to #big-deals in Slack.
> Set up a webhook for our backend. When a new user signs up, send them a welcome email and notify #growth in Slack.
Make it automatic [#make-it-automatic]
Webhooks are inherently automatic — once the URL is registered with the external service, your agent responds to every event without you doing anything. There's no schedule to configure because the external service decides when to fire.
Connect your integrations [#connect-your-integrations]
For output actions like posting to Slack or Discord, connect those services from the **Integrations** page. The webhook itself doesn't require a connection — it's just an incoming URL that any service can call.
Related recipes [#related-recipes]
# CRM Updates
What you'll build [#what-youll-build]
After every sales call, tell Nebula the key points and it will write a structured summary, then push the deal notes, next steps, and follow-up date directly into your CRM — so your pipeline stays current without manual data entry.
What to say [#what-to-say]
Tell Nebula which CRM you use and what fields to update. You can include as much or as little detail as you want — Nebula will structure it for you.
What happens [#what-happens]
You tell Nebula the key points from the call [#you-tell-nebula-the-key-points-from-the-call]
After a sales call, you share the highlights in plain language: who you spoke with, what they are interested in, any objections, next steps, and timeline. No need to fill out forms or follow a template.
Nebula summarizes and structures the notes [#nebula-summarizes-and-structures-the-notes]
Nebula takes your raw notes and organizes them into the fields your CRM expects — deal notes, next steps, follow-up date, contact info, and any custom fields you have configured.
The CRM deal record is updated [#the-crm-deal-record-is-updated]
Nebula pushes the structured update to your CRM via API. The deal notes are appended (not overwritten), the next step is set, and the follow-up date is added to the timeline so nothing falls through the cracks.
You get a confirmation with what was saved [#you-get-a-confirmation-with-what-was-saved]
Nebula shows you exactly what was written to the CRM so you can verify it before moving on. If anything needs adjusting, just tell Nebula and it will update the record.
Make it automatic [#make-it-automatic]
Nebula creates an event trigger that fires after each sales call on your calendar. You can view, pause, or delete it from the **Triggers** page in the sidebar.
Connect your integrations [#connect-your-integrations]
If your CRM is available on the **Integrations** page (like HubSpot or Salesforce), connect it there for the smoothest setup. For other CRMs, ask Nebula to set up a custom API connection — provide the base URL and a secure popup will appear for you to enter your API key or token.
Related recipes [#related-recipes]
# Email Campaigns
What you'll build [#what-youll-build]
Nebula researches each prospect on your list, drafts a personalized multi-step email sequence tailored to their company and role, and sends the series on a schedule with follow-ups, so your outreach feels personal at scale.
What to say [#what-to-say]
Adjust the audience, number of emails, and content to match your sales motion. You can provide a prospect list or let Nebula pull from your CRM.
What happens [#what-happens]
You provide the prospect list and campaign outline [#you-provide-the-prospect-list-and-campaign-outline]
Tell Nebula who you're targeting and what the email sequence should look like: how many emails, what each one should cover, and the tone you want. You can paste a list of names and companies, upload a CSV, or point Nebula at your CRM.
Nebula researches each prospect [#nebula-researches-each-prospect]
For each prospect, Nebula searches the web for recent news, company details, role information, and anything relevant to your pitch. This research powers the personalization in each email, so the outreach doesn't feel generic.
Personalized emails are drafted for each step [#personalized-emails-are-drafted-for-each-step]
Nebula writes the full sequence for each prospect, weaving in the research it found. Here's what a first email might look like:
***
**To:** [dana.kim@acmecorp.com](mailto:dana.kim@acmecorp.com)
**Subject:** Congrats on the Series B, Dana
Hi Dana,
Saw the news about Acme's Series B, congrats! As you scale the engineering team, onboarding new developers quickly becomes a bottleneck. We've helped companies at your stage cut onboarding time by 40% with automated environment setup.
Would love to share how. Worth a quick look?
Best,
\[Your name]
***
Each subsequent email in the sequence builds on the previous one, referencing the case study and then making a specific demo offer.
You review and Nebula sends on schedule [#you-review-and-nebula-sends-on-schedule]
Nebula presents all the drafted emails for your review. Once approved, it sends each step in the sequence on the schedule you set (for example, Day 1, Day 4, Day 8). If a prospect replies, the follow-ups are automatically paused.
Make it automatic [#make-it-automatic]
This sets up an event trigger that fires whenever a new lead appears in your CRM. Each lead gets a fully personalized sequence drafted and queued for your approval.
Connect your integrations [#connect-your-integrations]
This recipe uses email and web search. Connect your email account from the **Integrations** page. If you want Nebula to pull prospects directly from your CRM, connect that integration as well.
Related recipes [#related-recipes]
# Sales & Outreach
Turn hours of research and copy-paste into a single conversation. These recipes help you learn about prospects quickly, write outreach that actually gets responses, and keep your records current.
**What you'll need:** Connect your email account for sending outreach. For CRM updates, connect your CRM from the **Connections** page, or ask Nebula to set up a custom API connection.
# Research a Prospect and Draft Outreach
What you'll build [#what-youll-build]
Give Nebula a company name and get back a research brief with key facts, decision makers, and a personalized cold outreach email ready to send.
What to say [#what-to-say]
What happens [#what-happens]
Nebula searches for the latest company news [#nebula-searches-for-the-latest-company-news]
Nebula searches the web for recent information about the company: funding announcements, product launches, press coverage, and anything else that gives you context before you reach out.
Key people are identified [#key-people-are-identified]
Nebula finds the relevant decision makers at the company (typically the CEO, CTO, or the head of whichever department your product is most relevant to), along with any publicly available context about their role.
A research brief is put together [#a-research-brief-is-put-together]
Everything is compiled into a short summary you can actually use. It looks something like this:
***
Acme Corp: Research Brief
Funding: Raised $24M Series B in November 2024 led by Sequoia. Total raised: $31M.
What they're building: An AI-powered inventory management platform for mid-market retailers. Recently launched a real-time demand forecasting feature.
Team size: \~85 employees, growing fast in engineering and sales.
Key contacts:
* Sarah Chen: CEO & Co-founder. Previously VP Product at Shopify.
* Marcus Webb: CTO. Led infrastructure at two previous logistics startups.
* Priya Nair: Head of Partnerships. Joined six months ago from a SaaS background.
Recent milestones: Announced a partnership with a major 3PL provider last month. Featured in TechCrunch last week.
***
A personalized outreach email is drafted [#a-personalized-outreach-email-is-drafted]
Using the research, Nebula drafts a cold email that references the company's specific situation, not a generic template. It might look like this:
***
Subject: Congrats on the Series B, quick thought on your forecasting rollout
Hi Sarah,
Congrats on the Series B, impressive traction, and the demand forecasting launch caught my eye.
As you scale that feature, one thing teams often run into is keeping the underlying data pipelines reliable as SKU counts grow. That's exactly what we help with at \[Your Company]; we've worked with a few other inventory platforms in the post-Series B phase to get that infrastructure production-ready without it becoming a distraction for the engineering team.
Worth a 20-minute call to see if there's a fit? Happy to work around your schedule.
\[Your name]
***
Make it automatic [#make-it-automatic]
Related recipes [#related-recipes]
# Competitor Tracking
What you'll build [#what-youll-build]
Nebula monitors the web for competitor activity — product launches, funding rounds, blog posts, and hiring news — and delivers a structured summary on a schedule, so you always know what your competitors are up to without manually checking dozens of sources.
What to say [#what-to-say]
Replace the company names with your actual competitors. You can track as many companies as you want and customize what types of activity to look for.
What happens [#what-happens]
Nebula searches the web for each competitor [#nebula-searches-the-web-for-each-competitor]
For each company you list, Nebula runs targeted web searches looking for recent news, press releases, blog posts, and social media activity. It searches across multiple sources to get broad coverage.
Recent activity is identified and categorized [#recent-activity-is-identified-and-categorized]
Nebula filters the results to the time window you specified (e.g., the past week) and categorizes what it finds: product launches, funding rounds, new hires, partnerships, and content published.
A structured report is compiled [#a-structured-report-is-compiled]
Each competitor gets its own section with a clear summary of what happened. If nothing notable was found, Nebula says so — no fluff or filler.
The report is delivered to Slack [#the-report-is-delivered-to-slack]
Your Slack Agent posts the finished report to the channel you specified. The format is easy to scan so your team can quickly see what matters.
Make it automatic [#make-it-automatic]
Nebula creates a scheduled trigger that runs this task automatically each week. You can view, pause, or delete it from the **Triggers** page in the sidebar.
Connect your integrations [#connect-your-integrations]
This recipe uses web search (built in) and the Nebula Slack bot for delivery. Add the Slack bot to your workspace from the **Integrations** page and make sure it's been invited to your target channel.
Related recipes [#related-recipes]
# Content Scheduling
What you'll build [#what-youll-build]
Nebula drafts a batch of social media posts based on your latest content, matches your brand voice, and schedules them across the week, so your social presence stays active without daily manual effort.
What to say [#what-to-say]
Adjust the topic, number of posts, and tone to fit your brand. You can also ask Nebula to generate posts for multiple platforms at once.
What happens [#what-happens]
You describe the topic and brand voice [#you-describe-the-topic-and-brand-voice]
Tell Nebula what you want to post about and how it should sound. You can reference specific products, campaigns, blog posts, or just give a general topic. If you've set up a Content Strategist agent with your brand guidelines, Nebula will use those automatically.
Nebula researches your latest content [#nebula-researches-your-latest-content]
Nebula checks your recent blog posts, product pages, or any URLs you provide to pull in real details, stats, and talking points. This ensures the posts are grounded in actual content rather than generic filler.
Posts are drafted with varied tones [#posts-are-drafted-with-varied-tones]
Nebula writes each post with a different angle or tone so your feed doesn't feel repetitive. Here's what a batch might look like:
***
**Monday 9:00 AM** — Professional announcement
"We're excited to announce Acme 2.0 — rebuilt from the ground up with a new API, faster dashboards, and team-level permissions. Available today."
**Tuesday 12:00 PM** — Casual and conversational
"Just shipped something we've been working on for months. Acme 2.0 is live and it's a big one."
**Wednesday 3:00 PM** — Question to drive engagement
"What if setting up your entire dev environment took 30 seconds instead of 30 minutes? That's Acme 2.0."
**Thursday 10:00 AM** — Stats-driven
"3x faster load times. 50% fewer clicks to complete setup. 12 new integrations. Acme 2.0 is here."
**Friday 11:00 AM** — Teaser for the weekend
"The response to Acme 2.0 this week has been incredible. If you haven't tried it yet, your weekend project just found its tool."
***
You review and Nebula schedules the posts [#you-review-and-nebula-schedules-the-posts]
Nebula shows you all the drafts together. You can edit, reorder, or ask for rewrites. Once you approve, Nebula schedules each post at the times shown and publishes them automatically through your Twitter Agent.
Make it automatic [#make-it-automatic]
Nebula creates a scheduled trigger that runs every Monday. You review the batch, approve (or edit), and the posts go out on schedule for the rest of the week.
Connect your integrations [#connect-your-integrations]
This recipe uses Twitter. Connect your Twitter account from the **Integrations** page so Nebula can schedule and publish posts on your behalf. If you want Nebula to pull content from your blog or CMS automatically, connect that integration as well.
Related recipes [#related-recipes]
# Social Media
Stay on top of your social presence without spending your day in Twitter. These recipes track what people are saying, help you respond, and keep your content moving.
**Uses:** Twitter. When you first ask Nebula to check your mentions, it will prompt you to connect your Twitter account.
# Monitor Twitter Mentions and Draft Replies
What you'll build [#what-youll-build]
Nebula watches your Twitter mentions and drafts replies for you to review. You stay on top of conversations without constantly refreshing Twitter.
What to say [#what-to-say]
What happens [#what-happens]
Pull your mentions [#pull-your-mentions]
Nebula asks your Twitter account for all mentions that arrived today and fetches the full context of each conversation.
Read and understand each mention [#read-and-understand-each-mention]
For each mention, Nebula reads the tweet, any thread context, and the account that sent it, so the reply fits the conversation, not just the single tweet.
Draft a reply [#draft-a-reply]
Nebula writes a contextual reply for each mention in a professional and friendly tone. Here's an example of what you might see:
***
@alice\_dev: *"Just tried @yourbrand for the first time. Really impressed with how fast the setup was!"*
Draft reply: "Thank you so much, Alice! Really glad the setup felt seamless! Let us know if there's anything we can help you with as you explore further."
***
@bob\_founder: *"@yourbrand any plans to support GitHub Actions integration?"*
Draft reply: "Great question, Bob! GitHub Actions integration is on our roadmap. Happy to share more details; feel free to DM us or drop your email and we'll keep you posted."
***
@carol\_ux: *"Shoutout to @yourbrand for their excellent support team. Issue resolved in under an hour!"*
Draft reply: "That means a lot, Carol! Thank you for sharing! We'll pass this along to the team. So glad we could help quickly."
Review before sending [#review-before-sending]
Nebula presents all the drafts together. You can edit any reply, skip ones you don't want to send, or ask Nebula to rewrite a draft with a different tone before anything goes live.
Make it automatic [#make-it-automatic]
You have two options depending on how hands-on you want to be.
**Check on a schedule**: Nebula checks your mentions every two hours and surfaces a batch of drafts for you to review:
**React as it happens**: Nebula drafts a reply the moment someone mentions you and sends it to you for approval before posting:
Connect your integrations [#connect-your-integrations]
This recipe uses Twitter. Connect your Twitter account from the **Integrations** page; Nebula uses OAuth so you stay in control of permissions. If you have more than one account connected, Nebula will ask which one to use.
Related recipes [#related-recipes]
You interact with Nebula through channels. Nebula figures out which agents to use, runs them on your cloud [Device](/docs/devices), and delivers the results — all from a single conversation.
What can you do with Nebula? [#what-can-you-do-with-nebula]
**Ask it to research things.** *"Find the top 3 trending AI papers this week and summarize them."*
**Have it write and run code.** *"Analyze this CSV and create a chart of monthly revenue."*
**Automate recurring work.** *"Every weekday at 9 AM, search for AI news and post a summary to #daily-news in Slack."*
**Connect to your apps.** *"Reply to that Twitter mention with a thank-you message."* Nebula has native bots for [Slack](/docs/connect/slack), [Discord](/docs/connect/discord), and [Telegram](/docs/connect/telegram), plus 1,000+ external services:
Next steps [#next-steps]
If you get stuck, just ask Nebula — it can help with most setup questions. For bugs or feature requests, email [support@nebula.gg](mailto:support@nebula.gg)
# Prompt Tips
You don't need special syntax to use Nebula. Just say what you want in plain language. That said, a few patterns consistently produce better results.
Be specific about what you want [#be-specific-about-what-you-want]
Vague requests get vague answers. Tell Nebula exactly what output you expect.
The second prompt works better because it names the competitors, specifies the time range, and says exactly what output to produce.
Chain multiple steps in one request [#chain-multiple-steps-in-one-request]
Nebula handles multi-step tasks well. You don't need to break things into separate messages.
Specify format and length [#specify-format-and-length]
If you want a particular format, say so. Nebula defaults to paragraphs, but it can produce bullet points, tables, code, emails, tweets — whatever you need.
* "Give me a bullet-point list, max 5 items"
* "Write a 3-tweet thread"
* "Format this as a markdown table with columns for name, price, and rating"
* "Keep it under 100 words"
* "Write this as an email to a non-technical audience"
Use @ mentions for specific agents [#use--mentions-for-specific-agents]
When you have multiple agents, you can direct requests to a specific one using `@agent-name`.
You don't always need to @ mention — Nebula automatically delegates to the right agent when it's obvious. But explicit mentions help when the task could go to multiple agents.
Ask Nebula to automate it [#ask-nebula-to-automate-it]
Once you get a result you like, tell Nebula to make it recurring. You don't need to learn a separate automation system.
Give context when it matters [#give-context-when-it-matters]
Nebula doesn't know your internal terminology, company context, or preferences unless you tell it. For recurring needs, add context to your [agent instructions](/docs/agents/instructions) so you don't have to repeat yourself.
Prompts you can copy right now [#prompts-you-can-copy-right-now]
Here are high-value prompts to try immediately:
**Research:**
* "Search for the top 5 trending topics in \[your industry] this week and summarize each in one paragraph"
* "Compare \[Product A] vs \[Product B] — pricing, features, and reviews"
**Productivity:**
* "Read #standup on Slack and post a summary of blockers to #team"
* "Find all open GitHub issues labeled 'bug', prioritize by age, and post the list to #engineering"
**Automation:**
* "Every morning at 9am, search for news about \[topic] and post a digest to #general"
* "When someone posts in #support on Slack, draft a helpful reply and send it to me for review"
**Content:**
* "Write a tweet thread about \[topic], aimed at developers, with a hook and CTA"
* "Draft a weekly email update for the team summarizing what shipped this week"
Not sure how to phrase something? Just try it — Nebula will ask for clarification if it needs more detail. You can also ask "What can you do?" for a quick overview.
Related [#related]
# Quickstart
This guide gets you from zero to a fully configured workspace in under two minutes. No coding required — just sign up and talk to Nebula.
Sign up [#sign-up]
Go to [nebula.gg](https://nebula.gg) and create a free account. Enter your email, verify with a one-time code, and you're in. The free plan includes $10 in credits, which is plenty to explore.
Set up your profile [#set-up-your-profile]
Fill in your name, pick a timezone, and optionally connect your apps (Slack, Discord, Telegram). You can also choose a visual theme. This takes about 30 seconds.
Let Nebula set up your workspace [#let-nebula-set-up-your-workspace]
Nebula opens a direct message and asks a few quick questions about your role and workflow. Based on your answers, it creates agents, channels, and triggers tailored to you.
Start chatting [#start-chatting]
Your workspace is ready. Open any channel or stay in the Nebula DM and start asking for things.
What to try next [#what-to-try-next]
Here are some prompts you can copy and paste right now:
* "Summarize the last 24 hours of messages in #general on Slack"
* "Find all open GitHub issues labeled 'bug' and create a priority list"
* "Every Monday at 9am, search for industry news and post a digest to #team"
* "Create a new agent that monitors Twitter for mentions of our brand"
Stuck on something? Ask Nebula for help — it can troubleshoot issues, walk you through setup, and even configure things for you. For bugs or feature requests, email [support@nebula.gg](mailto:support@nebula.gg).
# What Nebula Can Do
Nebula is a general-purpose AI agent that can research, write, code, and take actions across your connected apps. Here's a clear breakdown of what it handles today and where its limits are.
Research and information [#research-and-information]
You can ask Nebula to find, read, and summarize information from across the web.
Search the web for current information on any topic.
Read and summarize articles, PDFs, and web pages.
Compare products, pricing, and competitors side by side.
Fact-check claims against multiple sources.
Writing and content [#writing-and-content]
Nebula writes, edits, and rewrites content in any format or tone.
Blog posts, emails, and social media threads.
Technical documentation and reports.
Adjust tone, length, or audience for existing content.
Translate between languages.
Code and data analysis [#code-and-data-analysis]
Your agent writes and runs Python, Bash, and TypeScript on your [Device](/docs/devices) with data science libraries pre-installed.
Analyze CSVs and spreadsheets with pre-installed data science libraries.
Generate charts and visualizations from your data.
Write and debug scripts in Python, Bash, and TypeScript.
Process and transform data into the formats you need.
App actions [#app-actions]
When you [connect an app](/docs/connect), Nebula can interact with it directly.
Read channels, send messages, and post summaries.
Send messages and monitor channels.
Post tweets, search mentions, and draft replies.
Send messages and create polls.
List issues and PRs, triage, and comment.
Read, compose, and send emails.
Connect via [external services](/docs/connect/external-services) using OAuth.
Automation [#automation]
Nebula can run tasks on a schedule or in response to events — no code needed.
Schedule recurring tasks on a daily, weekly, or custom cron cadence.
Trigger actions from events — a new Slack message, GitHub issue, or webhook.
Chain multiple steps together into a single automated workflow.
Media [#media]
Nebula can generate and process images, audio, and other media.
Generate images from text descriptions.
Transcribe audio recordings into text.
Convert text to spoken audio.
Process and describe images.
Browser [#browser]
Nebula can open browser sessions to interact with websites that don't have APIs.
Log into authenticated sites with 1Password integration.
Fill out forms, click buttons, and extract data from web pages.
Navigate multi-step web workflows end to end.
Collaboration between agents [#collaboration-between-agents]
Multiple agents can work together on a single request. Nebula delegates tasks to specialized agents automatically.
Next steps [#next-steps]
# Recipe Catalogue
Copy-paste these prompts to automate everyday tasks with Nebula. Pick a category below to find recipes for communication, daily ops, reporting, development, sales, and social media.
# Billing
The **Billing** tab in Settings is where you manage your subscription and payment details.
Managing your plan [#managing-your-plan]
Upgrades take effect immediately. Downgrades take effect at the start of your next billing cycle. See [nebula.gg](https://nebula.gg) for current plans and pricing.
View your current balance and purchase additional credits. See [nebula.gg](https://nebula.gg) for current minimum and maximum purchase amounts.
Your subscription renews on a rolling cycle from your start date, not the 1st of the month. See [nebula.gg/settings/billing](https://nebula.gg/settings/billing) for your next renewal date.
View past purchases and usage-based charges.
Enable automatic credit purchases when your balance drops below a configurable threshold. You can customize the threshold and top-up amount in your [billing settings](https://nebula.gg/settings/billing).
Nebula accepts all major credit and debit cards via Stripe.
FAQ [#faq]
General [#general]
Nebula uses a credit-based billing system. Every AI interaction — including messages, tool calls, agent executions, and automated trigger runs — consumes credits from your account balance. Credits are priced based on the underlying cost of the LLM models and compute used.
Usage is measured by your **credit balance**, which decreases as you use the platform. Each AI request deducts credits based on the cost of the underlying model call. Your account is paused when your credit balance drops too low.
Your current balance is visible at [nebula.gg/settings/billing](https://nebula.gg/settings/billing). See [nebula.gg](https://nebula.gg) for current pricing details.
Plans and limits [#plans-and-limits]
Nebula offers multiple plans to fit different needs, from a free tier for exploration to team plans for heavy workloads. New accounts receive free credits on signup, and subscribing to a paid plan grants additional bonus credits.
See [nebula.gg](https://nebula.gg) for current plans, pricing, and signup bonuses.
No. Nebula does not charge overages. When your credit balance is exhausted, your account is paused. You can purchase additional credits at any time to resume immediately. See [nebula.gg](https://nebula.gg) for details on plan limits.
Yes. Upgrades take effect immediately. Downgrades are scheduled for the end of your current billing period — you keep your current plan until then.
Usage and notifications [#usage-and-notifications]
Yes. Nebula sends automated email notifications when your balance drops below configured thresholds, including a low balance warning and a depleted warning.
A real-time usage progress indicator inside the product is not yet available but is on the roadmap.
Triggers and automations [#triggers-and-automations]
Yes. Every trigger execution — whether cron-scheduled, event-driven, or webhook-triggered — consumes credits from the same balance as manual interactions. Each step in a trigger's task recipe that calls an LLM or runs an agent counts toward usage.
If your credit balance is exhausted, active triggers will stop firing until credits are replenished.
Credit consumption depends on:
* The number of LLM steps in the task recipe
* The models used (larger models cost more per token)
* The frequency of the trigger (e.g., every 30 minutes vs. once daily)
For an estimate, run your automation a few times manually and check the credit balance before and after in your [billing settings](https://nebula.gg/settings/billing).
Account pausing and cancellation [#account-pausing-and-cancellation]
Your account is paused:
* New messages and agent executions are blocked.
* Scheduled and event-based triggers stop firing.
* Your files, automations, and account data are fully preserved.
You can resume immediately by purchasing additional credits.
Your account remains intact — files, agents, triggers, and task recipes are not deleted. Only new executions are blocked. If you re-subscribe later, everything will be exactly as you left it.
No. Enforcement is applied immediately when the credit balance drops below the minimum threshold. If your balance hits zero during a running request, the request is terminated to prevent a negative balance.
Free tier [#free-tier]
The free plan includes starter credits and access to the full Nebula feature set, including agents, triggers, and integrations. It is designed for evaluation and light personal use. See [nebula.gg](https://nebula.gg) for the current free credit amount.
Your account is paused in the same way as a paid plan. You will receive an email notification. Subscribe to a paid plan to unlock credit purchasing and resume usage.
Credits and payments [#credits-and-payments]
From the billing page, click **Buy Credits** and enter your desired amount. Credits are added to your balance immediately after payment. See [nebula.gg](https://nebula.gg) for current minimum and maximum purchase amounts.
Auto top-up automatically purchases credits when your balance drops below a threshold you configure. You can customize both the threshold and the top-up amount in your [billing settings](https://nebula.gg/settings/billing).
Some capabilities have additional per-use costs deducted from your credit balance. See [nebula.gg](https://nebula.gg) for the current cost schedule.
Nebula accepts all major credit and debit cards via Stripe. Annual billing options may be available — contact [support@nebula.gg](mailto:support@nebula.gg) for details.
Billing history and downloadable invoices are available at [nebula.gg/settings/billing](https://nebula.gg/settings/billing).
Email [support@nebula.gg](mailto:support@nebula.gg) with the subject line "Billing" and we will respond within one business day.
For any billing questions not covered here, email [support@nebula.gg](mailto:support@nebula.gg) or ask Nebula directly — it can help you draft a support request.
# Profile & Preferences
You can manage your profile, appearance, and default AI model from the **General** tab in Settings.
Getting to settings [#getting-to-settings]
On the web, click **Settings** at the bottom of the left sidebar. On mobile, tap the **Settings** tab in the bottom navigation bar.
Profile [#profile]
* **Username** — Your unique handle (3–30 characters, lowercase). This also determines your Nebula email address: `username@nebula.me`.
* **Timezone** — Set your local timezone. This affects when scheduled automations fire.
Appearance [#appearance]
Choose a theme for the Nebula interface. Themes are filterable by **Dark** or **Light**, and each one shows a color preview so you can see what it looks like before selecting.
Default model [#default-model]
Set the default AI model for all your agents. Agents without a pinned model will use this one. You can browse verified and experimental models, and each one shows capability badges (thinking, vision, caching) and pricing info.
To override the default for a specific agent, pin a model from that agent's detail page. See [Choosing a Model](/docs/agents/models).
Account [#account]
* **Sign out** — Sign out of your current device.
* **Delete account** — Permanently delete your account and all associated data, including integrations, files, channels, conversations, tasks, triggers, and encrypted secrets.
# Usage
The **Usage** tab in Settings shows how you're consuming resources on the platform. Every AI interaction — messages, agent tasks, tool calls, and automation runs — uses credits.
Filtering by time period [#filtering-by-time-period]
Use the dropdown to filter usage data by:
* Current billing period (paid plans)
* Last 7, 14, 30, 60, or 90 days
What you'll see [#what-youll-see]
Total credits consumed across all AI interactions.
Request count with daily average.
Daily credit breakdown chart, color-coded by model.
Daily cost breakdown by model and tool (paid plans only).
When your balance runs low, Nebula sends automated email notifications. If your balance reaches zero, new messages and automations pause until credits are replenished or your cycle resets.
# Changelog
Nebula writes its own changelog. Visit [nebula.ghost.io](https://nebula.ghost.io/) for the latest platform updates, new features, and bug fixes.
You can also ask Nebula directly: "What's new?" or "What changed recently?" — it knows about recent updates.
# Getting Support
The fastest way to get help is to ask Nebula. Your agent has tools to interact with the system directly — it can create channels, modify agents, check your billing, and troubleshoot most issues on the spot.
Ask Nebula first [#ask-nebula-first]
Nebula can handle most support questions without you leaving the chat. Try asking things like:
Nebula can also help you compose detailed support emails when you need to reach the team:
Contact the team [#contact-the-team]
For bug reports, feature requests, or anything Nebula can't resolve directly:
* **Email:** [support@nebula.gg](mailto:support@nebula.gg)
* **Response time:** Typically within 24 hours on business days
When writing to support, include:
* What you were trying to do
* What happened instead
* Your workspace ID (ask Nebula if you're not sure)
Browse the docs [#browse-the-docs]
# Auto-Replies
What you'll build [#what-youll-build]
Nebula monitors your Slack support channel for new questions, checks them against your knowledge base, and posts accurate replies in the thread within seconds, so common questions get answered instantly without pulling your team away from deep work.
What to say [#what-to-say]
Adjust the channel, knowledge source, and reply style to match your setup. You can also tell Nebula to tag a team member when it isn't confident in a match.
What happens [#what-happens]
Nebula watches your support channel for new questions [#nebula-watches-your-support-channel-for-new-questions]
Nebula monitors #support for incoming messages. When a new message arrives, it reads the full text and determines whether it's a question that could be answered from your knowledge base.
The question is matched against your knowledge base [#the-question-is-matched-against-your-knowledge-base]
Nebula searches your knowledge base (docs, FAQs, past answers) for content that matches the question. It looks for semantic matches, not just keyword hits, so questions phrased differently from your docs still get caught.
A reply is drafted and confidence is assessed [#a-reply-is-drafted-and-confidence-is-assessed]
Nebula drafts a reply based on the best-matching knowledge base content. If the confidence is high, it posts the reply directly. If the match is uncertain, it flags the question for your team instead of risking an inaccurate answer. Here's an example of what a reply looks like:
***
**#support** — New question from @jamie
*"How do I connect my GitHub account?"*
Nebula's reply: "You can connect your GitHub account from the Integrations page. Click **Add Integration**, select GitHub, and follow the OAuth flow. Once connected, your repos will be available within a few seconds. Here's the full guide: docs.example.com/integrations/github"
***
The reply is posted in the thread [#the-reply-is-posted-in-the-thread]
Nebula posts its answer as a threaded reply so the main channel stays clean. If you've configured review mode, the draft goes to a review queue instead, and you approve it before it's posted.
Make it automatic [#make-it-automatic]
This sets up an event trigger that fires on every new message in #support. Nebula handles the common questions instantly and escalates the rest.
Connect your integrations [#connect-your-integrations]
This recipe uses Slack. Add the Nebula Slack bot from the **Integrations** page, then invite the bot to the #support channel (and any other channels you want it to monitor). Make sure your knowledge base content is accessible to Nebula so it can search against it.
Related recipes [#related-recipes]
# Cross-Platform Message Sync
What you'll build [#what-youll-build]
Nebula reads messages from your Slack channel, summarizes the key updates, and forwards them to a Discord channel (or vice versa) — so both communities stay aligned without manual copy-pasting.
What to say [#what-to-say]
What happens [#what-happens]
Nebula coordinates between your Slack and Discord agents [#nebula-coordinates-between-your-slack-and-discord-agents]
Nebula recognizes that this task spans two platforms and brings in both your Slack Agent and your Discord Agent. Each handles its own platform. Nebula orchestrates between them.
Slack Agent reads the latest messages [#slack-agent-reads-the-latest-messages]
Your Slack Agent fetches the last 20 messages from #announcements. It pulls the full message content along with who posted each one, so the summary has the right context.
Nebula summarizes the key updates [#nebula-summarizes-the-key-updates]
Nebula reads through the messages and distills them into a clear, concise summary, keeping the important announcements and leaving out the noise.
Discord Agent posts the summary [#discord-agent-posts-the-summary]
Your Discord Agent posts the finished summary to your Discord announcements channel. It looks something like this:
***
Slack Announcements Digest | Monday, March 3
Here's what was shared in #announcements today:
* New onboarding flow is live: Alex shipped the redesigned onboarding experience to production. All new signups will see the updated flow starting today.
* Staging environment updated: Jordan deployed the latest staging build. The new auth module is ready for QA testing.
* Design review scheduled: Sam confirmed a design review for the mobile nav changes on Wednesday at 2 PM. Product sign-off is pending on the feature flag rollout.
* API rate limit fix merged: Maya's fix for the API rate limit issue has been merged and will go out in the next release.
Synced from Slack #announcements by Nebula
***
Make it automatic [#make-it-automatic]
Nebula creates a scheduled trigger that runs this task automatically each day at 5 PM. You can view, pause, or delete it from the **Triggers** page in the sidebar.
Connect your integrations [#connect-your-integrations]
This recipe uses the Nebula Slack bot and the Nebula Discord bot. Add both bots from the **Integrations** page, then invite each bot to the channels you want to read from and post to.
Related recipes [#related-recipes]
# Digest Reports
What you'll build [#what-youll-build]
Nebula reads through your busiest Slack channels, groups messages by topic, highlights decisions and action items, and posts a clean digest so your team can catch up in 30 seconds instead of scrolling through hundreds of messages.
What to say [#what-to-say]
Adjust the channels, timeframe, and how you want the summary organized. You can ask for daily digests, weekly recaps, or summaries of specific date ranges.
What happens [#what-happens]
Nebula reads all messages from the target channels [#nebula-reads-all-messages-from-the-target-channels]
Your Slack Agent fetches every message from #product and #engineering within the specified timeframe. It pulls the full message text, who posted it, and any thread replies so nothing important gets missed.
Messages are grouped by topic [#messages-are-grouped-by-topic]
Nebula reads through all 142 messages and clusters them into logical topics like "mobile redesign," "API migration," and "Q2 planning." Related threads and side conversations get rolled into the right group.
Decisions and action items are highlighted [#decisions-and-action-items-are-highlighted]
Within each topic, Nebula identifies anything that looks like a decision ("we agreed to ship v2 on Thursday") or an action item ("@sam will update the staging environment by EOD"). These get called out explicitly so they don't get buried.
The digest is posted to your recap channel [#the-digest-is-posted-to-your-recap-channel]
Nebula compiles everything into a clean summary and posts it to #weekly-recap. It looks something like this:
***
Weekly Digest | #product + #engineering | Feb 24 -- Feb 28
**Mobile Redesign** (34 messages)
* Decision: Going with the tab-based navigation. Design approved by @lisa.
* Action item: @sam to update Figma prototypes by Monday.
**API Migration** (28 messages)
* Decision: Deprecating v1 endpoints on April 1. Migration guide drafted by @alex.
* Action item: @jordan to notify external partners by March 7.
**Q2 Planning** (19 messages)
* Decision: Prioritizing self-serve onboarding over enterprise features.
* Action item: @maya to finalize the roadmap doc and share by Friday.
**Bug Fixes** (12 messages)
* Fixed: Authentication timeout on mobile (shipped by @alex).
* In progress: Dashboard loading issue being investigated by @jordan.
**General** (49 messages)
* Team lunch scheduled for Thursday. Office hours moved to 3 PM.
***
Make it automatic [#make-it-automatic]
Nebula creates a scheduled trigger that runs automatically each Friday. You can view, pause, or delete it from the **Triggers** page in the sidebar.
Connect your integrations [#connect-your-integrations]
This recipe uses Slack. Add the Nebula Slack bot from the **Integrations** page, then invite the bot to the channels you want summarized and the channel where you want the digest posted.
Related recipes [#related-recipes]
# Communication
Your audience is spread across multiple platforms, but your message shouldn't have to be. These recipes keep everyone in the loop without you having to post the same thing in four different places.
**Uses:** Slack and Discord. If these aren't connected yet, Nebula will prompt you to connect them during the conversation.
# Inbox Triage
What you'll build [#what-youll-build]
Every morning, Nebula goes through your inbox, flags anything urgent, archives newsletters and low-priority messages, and drafts replies to emails that need a quick response — so you start the day with a clean, prioritized inbox instead of a wall of unread messages.
What to say [#what-to-say]
Adjust this to match how you organize your inbox. You can tell Nebula to sort by sender, priority, or topic instead.
What happens [#what-happens]
Nebula reads your recent emails [#nebula-reads-your-recent-emails]
Nebula connects to your email and pulls all new messages since the last triage. It reads the sender, subject line, and body of each email to understand what it is.
Emails are categorized by priority [#emails-are-categorized-by-priority]
Each email is sorted into one of four buckets: urgent (needs action today), needs reply (a quick response is expected), FYI (informational, no action needed), and archive (newsletters, marketing, and automated notifications).
Urgent emails are flagged [#urgent-emails-are-flagged]
Anything that looks time-sensitive — client requests with deadlines, outage alerts, messages from leadership — gets flagged and moved to the top of your inbox so you see it first.
Newsletters and noise are archived [#newsletters-and-noise-are-archived]
Marketing emails, automated notifications, and newsletters are archived automatically so they don't clutter your inbox. Nothing is deleted — you can always find them later.
Draft replies are prepared [#draft-replies-are-prepared]
For emails that need a quick response (meeting confirmations, scheduling requests, simple follow-ups), Nebula drafts a reply for you to review and send. You stay in control — nothing is sent without your approval.
Make it automatic [#make-it-automatic]
Nebula creates a scheduled trigger that runs this task automatically each morning. You can view, pause, or delete it from the **Triggers** page in the sidebar.
Connect your integrations [#connect-your-integrations]
This recipe requires email access. Connect your Gmail account from the **Integrations** page so Nebula can read, flag, archive, and draft replies on your behalf.
Related recipes [#related-recipes]
# Daily Operations
Start your day without the busywork. These recipes handle the routine updates, summaries, and prep work so you can focus on what actually needs your attention.
**Uses:** Slack and email. If these aren't connected yet, Nebula will prompt you to connect them during the conversation.
# Meeting Prep
What you'll build [#what-youll-build]
Before each meeting, Nebula researches the attendees and their company, pulls together background info, recent news, and talking points, and delivers a one-page brief so you walk into every call prepared.
What to say [#what-to-say]
Customize this with your actual meeting details. The more context you give Nebula (company name, attendee names, meeting purpose), the better the brief.
What happens [#what-happens]
Nebula identifies the meeting and attendees [#nebula-identifies-the-meeting-and-attendees]
Nebula takes the attendee names and company you provide (or pulls them from your calendar if a Calendar Agent is connected) and starts researching each person individually.
Each attendee is researched [#each-attendee-is-researched]
For every attendee, Nebula searches for their LinkedIn profile, professional background, recent posts, and any public mentions. It pulls together their role, career history, and anything notable.
The company is researched [#the-company-is-researched]
Nebula searches for the company's latest news: funding rounds, product launches, blog posts, press coverage, and hiring activity. It builds a snapshot of where the company stands right now.
A one-page brief with talking points is generated [#a-one-page-brief-with-talking-points-is-generated]
Everything is compiled into a clean, scannable brief. Nebula connects the dots — attendee backgrounds, company news, and your likely goals — to generate specific talking points you can use in the meeting.
Make it automatic [#make-it-automatic]
Nebula creates an event trigger tied to your calendar. You can view, pause, or delete it from the **Triggers** page in the sidebar.
Connect your integrations [#connect-your-integrations]
This recipe works best with Google Calendar connected so Nebula can automatically detect upcoming meetings and pull attendee details. Connect your Google Calendar from the **Integrations** page.
Related recipes [#related-recipes]
# Morning News Digest
What you'll build [#what-youll-build]
Every morning, Nebula searches the web for the latest news in your industry and sends you a digest with the top stories summarized, so you start the day informed without spending time hunting for articles.
What to say [#what-to-say]
What happens [#what-happens]
Nebula searches the web for today's news [#nebula-searches-the-web-for-todays-news]
Nebula runs a web search for recent articles matching your topic (in this case, AI and machine learning news from today). It looks across news sources and filters for fresh, relevant results.
The top stories are read and analyzed [#the-top-stories-are-read-and-analyzed]
Nebula reads through the top results and pulls out what matters: the headline, the source, and the key points. Duplicate stories and low-quality results are skipped.
Each story gets a short summary [#each-story-gets-a-short-summary]
Nebula writes a 2-3 sentence summary for each story in plain language: what happened, why it matters, and who it involves.
The digest is posted to your Slack channel [#the-digest-is-posted-to-your-slack-channel]
Your digest lands in #news (or whichever channel you specify). It looks something like this:
***
Morning News Digest | Monday, March 3
1. Google DeepMind releases Gemini 2.0 Ultra
Source: TechCrunch\*
Google DeepMind has announced Gemini 2.0 Ultra, claiming state-of-the-art performance on coding, math, and multimodal benchmarks. The model is initially available to enterprise customers via the Gemini API. A broader rollout is expected later this quarter.
2. OpenAI secures $40B in new funding
Source: The Verge\*
OpenAI has closed a $40 billion funding round led by SoftBank, pushing its valuation to $300 billion. The company says the funds will go toward compute infrastructure and expanding its research team. It marks the largest private tech funding round on record.
3. EU AI Act enforcement begins for high-risk systems
Source: Reuters\*
The European Union has started enforcement of the AI Act's provisions for high-risk AI systems, affecting healthcare, hiring, and critical infrastructure applications. Companies operating in the EU must now demonstrate compliance or face fines of up to €30 million. Industry groups have called for clearer implementation guidance.
4. Anthropic publishes new research on model interpretability
Source: MIT Technology Review\*
Anthropic released a paper describing advances in mechanistic interpretability, techniques for understanding what is happening inside large language models. The research identifies specific circuits responsible for factual recall and reasoning. Anthropic says the work is a step toward making AI systems more auditable.
***
Make it automatic [#make-it-automatic]
Nebula creates a scheduled trigger that runs this task automatically each morning. You can view, pause, or delete it from the **Triggers** page in the sidebar.
Related recipes [#related-recipes]
# Replace Zapier and Make with Nebula
What you'll build [#what-youll-build]
Take an existing Zapier zap or Make scenario and recreate it in Nebula using natural language. No drag-and-drop builders — just describe what you want and your agent handles the rest.
What to say [#what-to-say]
Common migrations [#common-migrations]
Here are Zapier/Make workflows that teams commonly move to Nebula:
Typeform → HubSpot + welcome email [#typeform--hubspot--welcome-email]
> When someone fills out our Typeform signup form, create a contact in HubSpot and send them a welcome email.
Set up a Typeform webhook pointing to Nebula. Your agent creates the HubSpot contact and sends the email in one step.
PostHog analytics → email summary [#posthog-analytics--email-summary]
> Every Monday, pull last week's key metrics from PostHog and email a summary to the leadership team.
A scheduled trigger replaces a multi-step Make scenario. Nebula connects to PostHog via custom API, formats the data, and sends the email.
Stripe payment → Google Sheet + Slack [#stripe-payment--google-sheet--slack]
> When a Stripe payment comes in, log it to our revenue spreadsheet and post the amount to #revenue in Slack.
A Stripe webhook triggers Nebula, which writes to a Google Sheet and posts to Slack — two actions from one event.
Ghost publish → tweet + Discord [#ghost-publish--tweet--discord]
> When I publish a new blog post on Ghost, tweet the title and link, and post an announcement to our Discord community channel.
A Ghost webhook fires when a post is published. Nebula drafts and posts the tweet, then sends a Discord message.
Why Nebula instead of Zapier [#why-nebula-instead-of-zapier]
* **Natural language.** Describe what you want instead of dragging steps through a visual builder.
* **Agent handles edge cases.** If an API returns an unexpected format or a step fails, your agent can reason about it and adapt, instead of just failing silently.
* **Custom APIs and webhooks built in.** No separate add-ons or tiers needed for custom integrations.
Make it automatic [#make-it-automatic]
Most Zapier replacements are automatic by nature — they're either webhook-triggered (the external service fires the event) or scheduled (Nebula runs the workflow on a timer). Tell Nebula which pattern you want:
Related recipes [#related-recipes]
# Daily Standup Summary to Slack
What you'll build [#what-youll-build]
Your agent reads #standup every morning at 9 AM, summarizes what everyone is working on, and posts the formatted summary to #team, so your whole team starts the day on the same page without anyone having to do the organizing.
What to say [#what-to-say]
What happens [#what-happens]
Nebula reads your standup channel [#nebula-reads-your-standup-channel]
Nebula asks your Slack Agent to fetch the latest messages from #standup. It looks at everything posted today and pulls out the relevant updates.
Updates are grouped by team member [#updates-are-grouped-by-team-member]
Each person's messages are grouped together so the summary is easy to scan, no hunting through a thread to find what one person said.
Blockers are highlighted [#blockers-are-highlighted]
Anything that looks like a blocker (something someone is stuck on or waiting for) gets called out separately so it doesn't get buried.
A formatted summary is posted to #team [#a-formatted-summary-is-posted-to-team]
Your Slack Agent posts the finished summary to #team. It looks something like this:
***
Standup Summary | Monday, March 3
Alex
* Finishing up the onboarding flow redesign
* Starting on the new dashboard components this afternoon
Maya
* Reviewed and merged three PRs from last week
* Working on the API rate limit fix
* Blocker: Waiting on credentials from the payments team before she can test end-to-end
Jordan
* Deployed the staging environment update
* Writing tests for the new auth module
Sam
* Syncing with design on the mobile nav changes
* Blocker: Needs sign-off from product before moving forward on the feature flag rollout
***
Make it automatic [#make-it-automatic]
Nebula creates a scheduled trigger that runs this task automatically each weekday morning. You can view, pause, or delete it from the **Triggers** page in the sidebar.
Connect your integrations [#connect-your-integrations]
This recipe uses the Nebula Slack bot. Add the bot to your workspace from the **Integrations** page, then make sure it's been invited to both #standup and #team so it can read and post messages.
Related recipes [#related-recipes]
# Chain Two APIs Together
What you'll build [#what-youll-build]
Connect two services that don't have a native integration. Pull data from one API, transform it, and push it into another — like syncing Sentry errors into a Notion incident log, or piping PostHog analytics into a Slack summary.
What to say [#what-to-say]
What happens [#what-happens]
You connect the source API [#you-connect-the-source-api]
Tell Nebula the service and base URL. The Agent Creator creates a dedicated agent for it (like "Sentry Monitor Agent") with action keys like `sentry-list-unresolved-issues`. A secure credential popup appears for you to enter the API key — it's never entered in the chat. If the destination is already in the Integrations page (like Notion), it already has its own agent.
Nebula delegates to the source agent [#nebula-delegates-to-the-source-agent]
Nebula delegates to the source agent, which calls `run_action` with the right action key to fetch the data you asked for.
Data is transformed to fit the destination [#data-is-transformed-to-fit-the-destination]
Nebula maps the fields from the source into the format the destination expects. You can tell it exactly what to include or let it figure out a sensible mapping.
Nebula delegates to the destination agent [#nebula-delegates-to-the-destination-agent]
Nebula delegates to the destination agent (like "Notion Agent") which calls `run_action` to create the records — Notion rows, Slack messages, spreadsheet entries, or whatever the target service accepts.
More chains to try [#more-chains-to-try]
> Pull our daily active users from PostHog and post a chart to #metrics in Slack every morning.
> When a Grafana alert fires, create an incident in PagerDuty with the alert details.
> Fetch all published posts from our Ghost blog and add them to a Notion content calendar with their publish dates.
> Pull open support tickets from our helpdesk API and post a daily count to #support in Slack.
Make it automatic [#make-it-automatic]
Combine API chaining with a scheduled trigger so the data flows automatically. You can also use a webhook trigger — for example, Sentry can fire a webhook when a new error appears, which triggers the chain immediately.
Connect your integrations [#connect-your-integrations]
For services in the Integrations page (Notion, Slack, GitHub), use OAuth. For everything else, ask Nebula to set up a custom API connection — a secure popup will appear for you to enter credentials.
Related recipes [#related-recipes]
# Analyze a CSV and Email the Results
What you'll build [#what-youll-build]
Upload a CSV file, and Nebula runs Python analysis, finds trends, generates charts, and emails you the results, no formulas or code required.
What to say [#what-to-say]
What happens [#what-happens]
You upload your file [#you-upload-your-file]
Drag your CSV into the chat or click the paperclip icon to attach it. Nebula accepts CSV, Excel (.xlsx), and JSON files.
Nebula analyzes the data [#nebula-analyzes-the-data]
Nebula's Code Agent writes and runs Python (using libraries like pandas and matplotlib) to work through your data. It identifies key trends, outliers, and patterns without you needing to write a single line of code.
Charts are generated [#charts-are-generated]
Nebula creates visualizations based on what it finds; for example, a monthly revenue chart or a breakdown by category. You'll see these directly in the chat before they're sent anywhere.
The summary is emailed to you [#the-summary-is-emailed-to-you]
Nebula sends the analysis and charts to your email. The summary looks something like this:
***
Sales Data Q4: Analysis Summary
* Revenue up 23% month-over-month across the quarter
* Top product: Widget Pro, accounting for 42% of total sales
* West region outperformed all others by 18%
* Highest single-day revenue: December 18 ($84,200)
* Two SKUs showed declining sales for three consecutive months and may warrant review
***
Make it automatic [#make-it-automatic]
Nebula creates a scheduled trigger that runs this task automatically each week. You can view, pause, or delete it from the **Triggers** page in the sidebar.
Tips [#tips]
For large datasets, ask Nebula to focus on specific columns or date ranges; for example, "Only look at Q4 data" or "Focus on the Revenue and Region columns." This speeds up the analysis and keeps the summary focused on what matters.
Related recipes [#related-recipes]
# Set Up Dashboard Alerts
What you'll build [#what-youll-build]
Nebula checks your analytics dashboard on a schedule, compares key metrics against the thresholds you set, and sends you a Slack alert when something crosses the line — so you catch drops in signups, spikes in errors, or revenue changes before they snowball.
What to say [#what-to-say]
Adjust the metric, threshold, and alert channel to fit your needs.
What happens [#what-happens]
Nebula connects to your analytics source [#nebula-connects-to-your-analytics-source]
Nebula calls your analytics API (Mixpanel, Amplitude, PostHog, or any REST endpoint) and pulls the current value for the metric you specified — in this case, daily signups.
The current metric is compared to the previous period [#the-current-metric-is-compared-to-the-previous-period]
Nebula fetches the same metric for the comparison window (yesterday, last week, or whatever baseline you chose) and calculates the percentage change.
The threshold check is evaluated [#the-threshold-check-is-evaluated]
If the change exceeds your threshold — here, a 20% drop — Nebula flags it as an alert. If the metric is within the normal range, no notification is sent and the check completes silently.
An alert is posted to Slack [#an-alert-is-posted-to-slack]
When a threshold is crossed, your Slack Agent posts a notification to the channel you specified. The alert includes the metric name, current value, previous value, and the percentage change so you have the context you need to act.
Make it automatic [#make-it-automatic]
Nebula creates a scheduled trigger that runs this check automatically each morning. You can view, pause, or delete it from the **Triggers** page in the sidebar.
Connect your integrations [#connect-your-integrations]
This recipe uses the Slack Agent and a connection to your analytics or monitoring tool. Connect Slack from the **Integrations** page. If your analytics service is listed there (like Mixpanel or PostHog), connect it directly. Otherwise, ask Nebula to set up a custom API connection — provide the base URL and a secure popup will appear for you to enter your API key or token.
Related recipes [#related-recipes]
# Data & Reporting
You don't need to know SQL or Python to get answers from your data. Upload a file, describe what you want to know, and your agent handles the rest, including sending the report to the right people on a schedule.
No connections needed for basic analysis; just upload your file. For scheduled reports delivered by email, Nebula will prompt you to connect your email account when needed.
# Automate a Weekly Metrics Report
What you'll build [#what-youll-build]
Every Friday, Nebula pulls your key metrics, compares them to last week, generates charts, and emails a formatted report to your team.
What to say [#what-to-say]
What happens [#what-happens]
Nebula gathers your data [#nebula-gathers-your-data]
Nebula searches the web or connects to your analytics tools to pull this week's numbers: traffic, signups, conversion rate, and anything else you want tracked.
Metrics are compared week-over-week [#metrics-are-compared-week-over-week]
Nebula's Code Agent writes Python to line up this week's numbers against last week's. Each metric gets a delta so you can see at a glance what moved and by how much.
Charts are generated [#charts-are-generated]
Nebula creates trend charts for each metric: traffic over time, daily signups, conversion rate by day. You'll see them in the chat before anything gets sent.
A formatted report is emailed to your team [#a-formatted-report-is-emailed-to-your-team]
Nebula sends the report and charts to your specified recipients. It looks something like this:
***
Weekly Metrics Report | Week of March 3
| Metric | This week | Last week | Change |
| --------------- | --------- | --------- | ------ |
| Traffic | 24,800 | 22,100 | +12% |
| Signups | 381 | 393 | −3% |
| Conversion rate | 4.2% | 4.2% | steady |
Traffic climbed this week, driven by a spike on Tuesday and Wednesday. Signups dipped slightly, but conversion held, so the drop looks like a traffic-mix effect rather than a funnel issue. Charts attached.
***
Make it automatic [#make-it-automatic]
Nebula creates a scheduled trigger that runs this task automatically each week. You can view, pause, or delete it from the **Triggers** page in the sidebar.
Connect your integrations [#connect-your-integrations]
For analytics data, Nebula can search the web or connect directly to your tools.
If your analytics platform isn't in the Integrations page, ask Nebula to set up a
custom API connection so it can pull data automatically.
Related recipes [#related-recipes]
# Automate Browser Tasks with 1Password
What you'll build [#what-youll-build]
Nebula opens a real browser session, retrieves your saved credentials from 1Password, logs into any website, and performs tasks like filling forms, extracting data, or placing orders, all without you touching the keyboard.
What to say [#what-to-say]
What happens [#what-happens]
Nebula opens a browser session [#nebula-opens-a-browser-session]
Nebula spins up a cloud browser through Browserbase. This is a full browser, not just an API call, so it can interact with any website the same way you would.
1Password credentials are retrieved securely [#1password-credentials-are-retrieved-securely]
Nebula fetches the relevant login from your connected 1Password vault. Your credentials are never stored in the conversation; they're passed directly to the browser session and discarded afterward.
Nebula logs into the target site [#nebula-logs-into-the-target-site]
Nebula navigates to the target website, fills in the login form, handles any multi-factor prompts it can (like TOTP codes stored in 1Password), and gets you into the authenticated session.
Nebula performs tasks on the page [#nebula-performs-tasks-on-the-page]
Once logged in, Nebula reads the page using accessibility snapshots, not screenshots, so it can interact with elements precisely. It searches, clicks, fills forms, and extracts data just like a human would.
Nebula returns the results to your conversation [#nebula-returns-the-results-to-your-conversation]
Nebula reports back with a summary of what it did: items ordered, data extracted, forms submitted, or whatever the task required. The browser session is closed automatically.
Setting up 1Password [#setting-up-1password]
To use browser automation with 1Password credentials:
1. Go to the **Integrations** page in Nebula and connect 1Password
2. You'll need a 1Password service account token with read access to the vault containing your credentials
3. Once connected, Nebula can retrieve any login stored in your vault during browser sessions
1Password credentials are fetched on-demand and never persisted in Nebula's memory or conversation history.
More things to try [#more-things-to-try]
> Go to our Grafana dashboard and grab the error rate for the last 24 hours.
> Fill out the vendor onboarding form on our internal portal with these details: company name Acme Corp, contact email [vendor@acme.com](mailto:vendor@acme.com), start date April 1.
> Check if our staging site loads correctly after the deploy and report any errors.
> Log into our AWS console and check the billing summary for this month.
Make it automatic [#make-it-automatic]
Nebula creates a scheduled trigger that opens a browser session on a schedule. Combine this with Slack or email to get regular reports from any authenticated web app.
Connect your integrations [#connect-your-integrations]
This recipe uses Browserbase for browser sessions and 1Password for credentials. Connect both from the **Integrations** page. Nebula will prompt you to set them up if they aren't connected when you try a browser task.
Related recipes [#related-recipes]
# Code Review Digest
What you'll build [#what-youll-build]
Every morning, Nebula checks your GitHub repo for open pull requests, summarizes each one — what it changes, who opened it, and how long it has been waiting — and posts a formatted digest to Slack so your team knows exactly what needs review.
What to say [#what-to-say]
Replace the repo and channel with your own.
What happens [#what-happens]
Nebula connects to GitHub and lists open PRs [#nebula-connects-to-github-and-lists-open-prs]
Your GitHub Agent fetches all open pull requests from the repo you specified. It pulls the title, author, creation date, and branch for each one.
Each PR's changes are read and summarized [#each-prs-changes-are-read-and-summarized]
Nebula reads the diff summary for each pull request and writes a short description of what the PR does — new features, bug fixes, refactors — in plain language.
Wait times and review status are calculated [#wait-times-and-review-status-are-calculated]
For each PR, Nebula calculates how long it has been open and checks whether any reviewers have been assigned or have left comments. PRs waiting longer than your threshold get flagged.
A formatted digest is posted to Slack [#a-formatted-digest-is-posted-to-slack]
Your Slack Agent posts the compiled digest to #dev. It looks something like this:
***
Code Review Digest | Monday, March 3
1. **Add Stripe webhook handler** — opened by @sarah, 3 days ago, +240 / −12
No reviewers assigned yet. Adds webhook endpoint for payment events and retry logic.
2. **Fix pagination bug on /users endpoint** — opened by @marcus, 1 day ago, +18 / −6
1 approval from @liu. Small fix for off-by-one error in cursor-based pagination.
3. **Refactor auth middleware** — opened by @jordan, 5 days ago, +310 / −185
Review requested from @alex — no response yet. Splits auth middleware into separate modules and adds unit tests.
4. **Update dependencies** — opened by @bot, 2 hours ago, +45 / −45
Automated PR. Bumps express, zod, and three dev dependencies to latest patch versions.
⚠️ 2 PRs waiting over 48 hours: #1 and #3
***
Make it automatic [#make-it-automatic]
Nebula creates a scheduled trigger that runs this task automatically each weekday morning. You can view, pause, or delete it from the **Triggers** page in the sidebar.
Connect your integrations [#connect-your-integrations]
This recipe uses the GitHub Agent and the Slack Agent. Connect your GitHub account and Slack workspace from the **Integrations** page, then make sure your Slack bot has been invited to the channel where you want the digest posted.
Related recipes [#related-recipes]
# Connect Any REST API to Your Agent
What you'll build [#what-youll-build]
Connect any REST API that isn't in the OAuth catalogue — self-hosted monitoring tools, internal company APIs, or any service that uses an API key or token. Once connected, your agent can call the API in any conversation.
What to say [#what-to-say]
What happens [#what-happens]
You describe your API [#you-describe-your-api]
Tell Nebula the service name and base URL. If the service has public API documentation, the Agent Creator can discover the endpoints automatically.
Nebula discovers or you define the endpoints [#nebula-discovers-or-you-define-the-endpoints]
The Agent Creator reads the API docs or you describe what you need — "I want to query dashboards and get alert status." It creates endpoint definitions with action keys like `grafana-get-dashboards` and `grafana-query-datasource`.
You configure authentication [#you-configure-authentication]
A secure credential popup appears where you enter your API key, token, or password. Nebula never asks for secrets in the chat. The Agent Creator sets up the auth method — header, query parameter, Bearer token, Basic auth, or JWT.
The Agent Creator creates a dedicated agent for the API [#the-agent-creator-creates-a-dedicated-agent-for-the-api]
The Agent Creator creates a new agent (like "Grafana Agent") with the API endpoints as its tools. The agent shows up in your agent list just like built-in agents.
Nebula delegates to the agent when you ask [#nebula-delegates-to-the-agent-when-you-ask]
From here on, just ask Nebula to do things with the connected service. Nebula delegates to the dedicated agent, which calls the right endpoints using `run_action`. No need to repeat the setup.
What kind of auth works [#what-kind-of-auth-works]
Nebula supports several authentication methods for custom APIs:
* **API key** — passed as a header or query parameter
* **Bearer token** — standard `Authorization: Bearer ` header
* **Basic auth** — username and password encoded in the header
* **JWT** — with key splitting, custom claims, and HMAC signing
More APIs to try [#more-apis-to-try]
> Connect my Sentry instance and alert me when new errors spike.
> Add our internal employee directory API so my agent can look up team members.
> Connect my Ghost blog so I can draft and publish posts through Nebula.
> Hook up PostHog so my agent can pull product analytics on demand.
Make it automatic [#make-it-automatic]
Combine a custom API connection with a scheduled trigger to get regular reports from any service, even if it's not in the Integrations page.
Troubleshooting [#troubleshooting]
**Auth errors (401/403):** Open the tool's credential popup from your agent settings and double-check the value. Make sure you're using the right header name — some services expect `Authorization: Bearer `, others use a custom header like `X-API-Key`. Also check that the key hasn't expired or been revoked.
**Timeout or connection refused:** Nebula needs to reach your API over the internet. If the service is self-hosted behind a firewall or VPN, you'll need to expose it through a tunnel (Cloudflare Tunnel, ngrok) or allow-list Nebula's IP range.
**Rate limits (429):** Nebula retries automatically when it hits a rate limit. If your API has aggressive rate limits, mention that when setting up the connection and Nebula will add delays between requests.
**Wrong response format:** If the API returns data in an unexpected shape, tell Nebula what the response should look like. For example: "The response has a `data` array where each item has `name` and `email` fields."
**SSL or certificate issues:** If your API uses a self-signed certificate, mention that during setup. Nebula can be configured to accept self-signed certs for your specific endpoint.
Related recipes [#related-recipes]
# Deployment Notifications
What you'll build [#what-youll-build]
Whenever your team deploys to production, Nebula automatically posts a formatted summary to Slack with the version number, what changed, and who deployed it — so your whole team stays in the loop without anyone having to write an update manually.
What to say [#what-to-say]
Customize the Slack channel and what details to include. You can add release notes, link to the diff, or tag specific people.
What happens [#what-happens]
A deployment event is received [#a-deployment-event-is-received]
When your CI/CD pipeline completes a production deployment, it fires a webhook event. Nebula's GitHub Agent picks up the deployment status event and passes the payload to Nebula for processing.
Nebula parses the deployment details [#nebula-parses-the-deployment-details]
Nebula extracts the key information from the event: version number, who triggered the deploy, timestamp, and the list of commits included. It cross-references with GitHub to get commit messages, PR titles, and author info.
A formatted summary is composed [#a-formatted-summary-is-composed]
Nebula puts together a clean, scannable message with the version, deployer, timestamp, and a list of changes. Each change includes the PR title, number, and author so your team can quickly see what shipped.
The summary is posted to Slack [#the-summary-is-posted-to-slack]
Your Slack Agent posts the deployment summary to the channel you specified. The entire flow — from deploy event to Slack message — happens automatically with no manual steps.
Make it automatic [#make-it-automatic]
Nebula creates an event trigger that fires on every successful production deployment. You can view, pause, or delete it from the **Triggers** page in the sidebar.
Connect your integrations [#connect-your-integrations]
This recipe uses the GitHub Agent for deployment events and the Slack Agent for posting notifications. Connect both from the **Integrations** page — make sure the Slack bot has been invited to your target channel.
Related recipes [#related-recipes]
# GitHub Issue Triage
What you'll build [#what-youll-build]
When new issues come in, Nebula reads each one, adds appropriate labels (bug, feature, docs), sets a priority, and assigns it to the right team member based on the area of code, so your backlog stays organized without anyone manually sorting through it.
What to say [#what-to-say]
What happens [#what-happens]
Nebula connects to GitHub and fetches unlabeled issues [#nebula-connects-to-github-and-fetches-unlabeled-issues]
Nebula asks your GitHub account for all open issues that haven't been labeled yet. It pulls the full title, body, and any existing metadata for each one.
Each issue is read and categorized [#each-issue-is-read-and-categorized]
Nebula reads the title and description of each issue and determines what kind it is: a bug report, a feature request, a documentation gap, or a general question.
Labels and priority are assigned [#labels-and-priority-are-assigned]
Based on the category and severity described in the issue, Nebula applies the appropriate labels and sets a priority level. Here's an example of what that looks like across three issues:
***
Issue #214: "Clicking Save on the settings page throws a 500 error"
Labels: `bug`, `priority: critical`
Assigned to: @alex *(backend)*
***
Issue #215: "Add support for dark mode in the dashboard"
Labels: `feature`, `priority: medium`
Assigned to: @maya *(frontend)*
***
Issue #216: "README doesn't explain how to set up local environment"
Labels: `docs`, `priority: low`
Assigned to: @jordan *(docs)*
***
The right team member is suggested or assigned [#the-right-team-member-is-suggested-or-assigned]
Nebula looks at the area of code involved (backend, frontend, docs, infrastructure) and assigns the issue to whoever owns that area. If it can't determine ownership confidently, it flags the issue for manual assignment instead.
Make it automatic [#make-it-automatic]
This sets up an event trigger that fires whenever a new issue is opened. Each issue gets labeled, prioritized, and assigned the moment it appears, no manual review needed.
Connect your integrations [#connect-your-integrations]
This recipe uses GitHub. Connect your GitHub account from the **Integrations** page. Make sure the repositories you want to triage are accessible to the account you connect.
Related recipes [#related-recipes]
# Development
Keep your project moving without getting buried in notifications. These recipes help your team stay aligned on what needs attention, what shipped, and what's ready to review — including connecting custom APIs, receiving webhooks, and integrating internal tools.
**Uses:** GitHub, Slack, and custom APIs. When you first ask Nebula to work with your repos, it will prompt you to connect your GitHub account and grant access. For custom APIs, provide the base URL and enter credentials through a secure popup.
# Connect Your Company's Internal Tools
What you'll build [#what-youll-build]
Connect your company's internal REST APIs — employee directories, inventory systems, internal wikis — so your agent can query them in natural language. Instead of navigating internal tools yourself, just ask.
What to say [#what-to-say]
What happens [#what-happens]
You describe your internal API [#you-describe-your-internal-api]
Tell Nebula the base URL, authentication method, and what the API does. If you have API documentation (OpenAPI/Swagger), share the URL and the Agent Creator will discover the endpoints automatically.
The Agent Creator creates a dedicated agent [#the-agent-creator-creates-a-dedicated-agent]
The Agent Creator creates the endpoint definitions (like `employee-directory-list-employees`), configures authentication, and creates a dedicated agent with those tools attached. A secure credential popup appears for you to enter your API key or token — it's never entered in the chat and is stored securely.
You query in natural language [#you-query-in-natural-language]
Ask questions in plain English. Nebula delegates to the dedicated agent, which calls `run_action` with the right action key, fetches the data, and formats the response.
More internal tools to connect [#more-internal-tools-to-connect]
> Connect our inventory API. Alert me in Slack when any product drops below 50 units in stock.
> Add our internal wiki search API so I can ask my agent to find documentation without leaving the chat.
> Connect our self-hosted Grafana instance. Pull the SLA dashboard every Monday and post it to #ops.
> Hook up our HR system's API so I can check PTO balances and upcoming time off for my team.
Keep in mind [#keep-in-mind]
Your internal API must be reachable from the internet for Nebula to call it. If it's behind a VPN or firewall, you'll need to expose it through a tunnel (like Cloudflare Tunnel or ngrok) or allow-list Nebula's IP range. Ask your IT team about the best approach for your setup.
Make it automatic [#make-it-automatic]
Combine an internal API connection with a scheduled trigger to get regular reports from systems that don't have built-in notification features.
Related recipes [#related-recipes]
# Receive Webhooks from Any Service
What you'll build [#what-youll-build]
Your agent gets a unique webhook URL. Paste it into any service — Stripe, GitHub, Typeform, Shopify — and whenever that service fires an event, your agent processes it and takes action, like posting to Slack or updating a database.
What to say [#what-to-say]
What happens [#what-happens]
Nebula creates a webhook URL [#nebula-creates-a-webhook-url]
Nebula generates a unique endpoint URL that listens for incoming HTTP POST requests from any external service.
You paste the URL into the external service [#you-paste-the-url-into-the-external-service]
Copy the webhook URL and add it to the service's webhook settings. For Stripe, that's Developers → Webhooks → Add endpoint. For GitHub, it's Settings → Webhooks.
The service sends events to your agent [#the-service-sends-events-to-your-agent]
When something happens — a payment, a push, a form submission — the service sends a JSON payload to your webhook URL. Nebula receives it and parses the data.
Your agent processes the event and takes action [#your-agent-processes-the-event-and-takes-action]
Based on the payload, your agent does what you asked: posts to Slack, creates a task, sends an email, or triggers another workflow. You defined the action in plain English when you set it up.
More webhooks to try [#more-webhooks-to-try]
> Set up a webhook for GitHub push events. When someone pushes to main, post a summary to #engineering with the commit messages.
> Create a webhook for Typeform. When someone submits our feedback form, save their responses to a Google Sheet and send me a Slack DM.
> Listen for Shopify order webhooks. When a new order comes in over $500, post it to #big-deals in Slack.
> Set up a webhook for our backend. When a new user signs up, send them a welcome email and notify #growth in Slack.
Make it automatic [#make-it-automatic]
Webhooks are inherently automatic — once the URL is registered with the external service, your agent responds to every event without you doing anything. There's no schedule to configure because the external service decides when to fire.
Connect your integrations [#connect-your-integrations]
For output actions like posting to Slack or Discord, connect those services from the **Integrations** page. The webhook itself doesn't require a connection — it's just an incoming URL that any service can call.
Related recipes [#related-recipes]
# CRM Updates
What you'll build [#what-youll-build]
After every sales call, tell Nebula the key points and it will write a structured summary, then push the deal notes, next steps, and follow-up date directly into your CRM — so your pipeline stays current without manual data entry.
What to say [#what-to-say]
Tell Nebula which CRM you use and what fields to update. You can include as much or as little detail as you want — Nebula will structure it for you.
What happens [#what-happens]
You tell Nebula the key points from the call [#you-tell-nebula-the-key-points-from-the-call]
After a sales call, you share the highlights in plain language: who you spoke with, what they are interested in, any objections, next steps, and timeline. No need to fill out forms or follow a template.
Nebula summarizes and structures the notes [#nebula-summarizes-and-structures-the-notes]
Nebula takes your raw notes and organizes them into the fields your CRM expects — deal notes, next steps, follow-up date, contact info, and any custom fields you have configured.
The CRM deal record is updated [#the-crm-deal-record-is-updated]
Nebula pushes the structured update to your CRM via API. The deal notes are appended (not overwritten), the next step is set, and the follow-up date is added to the timeline so nothing falls through the cracks.
You get a confirmation with what was saved [#you-get-a-confirmation-with-what-was-saved]
Nebula shows you exactly what was written to the CRM so you can verify it before moving on. If anything needs adjusting, just tell Nebula and it will update the record.
Make it automatic [#make-it-automatic]
Nebula creates an event trigger that fires after each sales call on your calendar. You can view, pause, or delete it from the **Triggers** page in the sidebar.
Connect your integrations [#connect-your-integrations]
If your CRM is available on the **Integrations** page (like HubSpot or Salesforce), connect it there for the smoothest setup. For other CRMs, ask Nebula to set up a custom API connection — provide the base URL and a secure popup will appear for you to enter your API key or token.
Related recipes [#related-recipes]
# Email Campaigns
What you'll build [#what-youll-build]
Nebula researches each prospect on your list, drafts a personalized multi-step email sequence tailored to their company and role, and sends the series on a schedule with follow-ups, so your outreach feels personal at scale.
What to say [#what-to-say]
Adjust the audience, number of emails, and content to match your sales motion. You can provide a prospect list or let Nebula pull from your CRM.
What happens [#what-happens]
You provide the prospect list and campaign outline [#you-provide-the-prospect-list-and-campaign-outline]
Tell Nebula who you're targeting and what the email sequence should look like: how many emails, what each one should cover, and the tone you want. You can paste a list of names and companies, upload a CSV, or point Nebula at your CRM.
Nebula researches each prospect [#nebula-researches-each-prospect]
For each prospect, Nebula searches the web for recent news, company details, role information, and anything relevant to your pitch. This research powers the personalization in each email, so the outreach doesn't feel generic.
Personalized emails are drafted for each step [#personalized-emails-are-drafted-for-each-step]
Nebula writes the full sequence for each prospect, weaving in the research it found. Here's what a first email might look like:
***
**To:** [dana.kim@acmecorp.com](mailto:dana.kim@acmecorp.com)
**Subject:** Congrats on the Series B, Dana
Hi Dana,
Saw the news about Acme's Series B, congrats! As you scale the engineering team, onboarding new developers quickly becomes a bottleneck. We've helped companies at your stage cut onboarding time by 40% with automated environment setup.
Would love to share how. Worth a quick look?
Best,
\[Your name]
***
Each subsequent email in the sequence builds on the previous one, referencing the case study and then making a specific demo offer.
You review and Nebula sends on schedule [#you-review-and-nebula-sends-on-schedule]
Nebula presents all the drafted emails for your review. Once approved, it sends each step in the sequence on the schedule you set (for example, Day 1, Day 4, Day 8). If a prospect replies, the follow-ups are automatically paused.
Make it automatic [#make-it-automatic]
This sets up an event trigger that fires whenever a new lead appears in your CRM. Each lead gets a fully personalized sequence drafted and queued for your approval.
Connect your integrations [#connect-your-integrations]
This recipe uses email and web search. Connect your email account from the **Integrations** page. If you want Nebula to pull prospects directly from your CRM, connect that integration as well.
Related recipes [#related-recipes]
# Sales & Outreach
Turn hours of research and copy-paste into a single conversation. These recipes help you learn about prospects quickly, write outreach that actually gets responses, and keep your records current.
**What you'll need:** Connect your email account for sending outreach. For CRM updates, connect your CRM from the **Connections** page, or ask Nebula to set up a custom API connection.
# Research a Prospect and Draft Outreach
What you'll build [#what-youll-build]
Give Nebula a company name and get back a research brief with key facts, decision makers, and a personalized cold outreach email ready to send.
What to say [#what-to-say]
What happens [#what-happens]
Nebula searches for the latest company news [#nebula-searches-for-the-latest-company-news]
Nebula searches the web for recent information about the company: funding announcements, product launches, press coverage, and anything else that gives you context before you reach out.
Key people are identified [#key-people-are-identified]
Nebula finds the relevant decision makers at the company (typically the CEO, CTO, or the head of whichever department your product is most relevant to), along with any publicly available context about their role.
A research brief is put together [#a-research-brief-is-put-together]
Everything is compiled into a short summary you can actually use. It looks something like this:
***
Acme Corp: Research Brief
Funding: Raised $24M Series B in November 2024 led by Sequoia. Total raised: $31M.
What they're building: An AI-powered inventory management platform for mid-market retailers. Recently launched a real-time demand forecasting feature.
Team size: \~85 employees, growing fast in engineering and sales.
Key contacts:
* Sarah Chen: CEO & Co-founder. Previously VP Product at Shopify.
* Marcus Webb: CTO. Led infrastructure at two previous logistics startups.
* Priya Nair: Head of Partnerships. Joined six months ago from a SaaS background.
Recent milestones: Announced a partnership with a major 3PL provider last month. Featured in TechCrunch last week.
***
A personalized outreach email is drafted [#a-personalized-outreach-email-is-drafted]
Using the research, Nebula drafts a cold email that references the company's specific situation, not a generic template. It might look like this:
***
Subject: Congrats on the Series B, quick thought on your forecasting rollout
Hi Sarah,
Congrats on the Series B, impressive traction, and the demand forecasting launch caught my eye.
As you scale that feature, one thing teams often run into is keeping the underlying data pipelines reliable as SKU counts grow. That's exactly what we help with at \[Your Company]; we've worked with a few other inventory platforms in the post-Series B phase to get that infrastructure production-ready without it becoming a distraction for the engineering team.
Worth a 20-minute call to see if there's a fit? Happy to work around your schedule.
\[Your name]
***
Make it automatic [#make-it-automatic]
Related recipes [#related-recipes]
# Competitor Tracking
What you'll build [#what-youll-build]
Nebula monitors the web for competitor activity — product launches, funding rounds, blog posts, and hiring news — and delivers a structured summary on a schedule, so you always know what your competitors are up to without manually checking dozens of sources.
What to say [#what-to-say]
Replace the company names with your actual competitors. You can track as many companies as you want and customize what types of activity to look for.
What happens [#what-happens]
Nebula searches the web for each competitor [#nebula-searches-the-web-for-each-competitor]
For each company you list, Nebula runs targeted web searches looking for recent news, press releases, blog posts, and social media activity. It searches across multiple sources to get broad coverage.
Recent activity is identified and categorized [#recent-activity-is-identified-and-categorized]
Nebula filters the results to the time window you specified (e.g., the past week) and categorizes what it finds: product launches, funding rounds, new hires, partnerships, and content published.
A structured report is compiled [#a-structured-report-is-compiled]
Each competitor gets its own section with a clear summary of what happened. If nothing notable was found, Nebula says so — no fluff or filler.
The report is delivered to Slack [#the-report-is-delivered-to-slack]
Your Slack Agent posts the finished report to the channel you specified. The format is easy to scan so your team can quickly see what matters.
Make it automatic [#make-it-automatic]
Nebula creates a scheduled trigger that runs this task automatically each week. You can view, pause, or delete it from the **Triggers** page in the sidebar.
Connect your integrations [#connect-your-integrations]
This recipe uses web search (built in) and the Nebula Slack bot for delivery. Add the Slack bot to your workspace from the **Integrations** page and make sure it's been invited to your target channel.
Related recipes [#related-recipes]
# Content Scheduling
What you'll build [#what-youll-build]
Nebula drafts a batch of social media posts based on your latest content, matches your brand voice, and schedules them across the week, so your social presence stays active without daily manual effort.
What to say [#what-to-say]
Adjust the topic, number of posts, and tone to fit your brand. You can also ask Nebula to generate posts for multiple platforms at once.
What happens [#what-happens]
You describe the topic and brand voice [#you-describe-the-topic-and-brand-voice]
Tell Nebula what you want to post about and how it should sound. You can reference specific products, campaigns, blog posts, or just give a general topic. If you've set up a Content Strategist agent with your brand guidelines, Nebula will use those automatically.
Nebula researches your latest content [#nebula-researches-your-latest-content]
Nebula checks your recent blog posts, product pages, or any URLs you provide to pull in real details, stats, and talking points. This ensures the posts are grounded in actual content rather than generic filler.
Posts are drafted with varied tones [#posts-are-drafted-with-varied-tones]
Nebula writes each post with a different angle or tone so your feed doesn't feel repetitive. Here's what a batch might look like:
***
**Monday 9:00 AM** — Professional announcement
"We're excited to announce Acme 2.0 — rebuilt from the ground up with a new API, faster dashboards, and team-level permissions. Available today."
**Tuesday 12:00 PM** — Casual and conversational
"Just shipped something we've been working on for months. Acme 2.0 is live and it's a big one."
**Wednesday 3:00 PM** — Question to drive engagement
"What if setting up your entire dev environment took 30 seconds instead of 30 minutes? That's Acme 2.0."
**Thursday 10:00 AM** — Stats-driven
"3x faster load times. 50% fewer clicks to complete setup. 12 new integrations. Acme 2.0 is here."
**Friday 11:00 AM** — Teaser for the weekend
"The response to Acme 2.0 this week has been incredible. If you haven't tried it yet, your weekend project just found its tool."
***
You review and Nebula schedules the posts [#you-review-and-nebula-schedules-the-posts]
Nebula shows you all the drafts together. You can edit, reorder, or ask for rewrites. Once you approve, Nebula schedules each post at the times shown and publishes them automatically through your Twitter Agent.
Make it automatic [#make-it-automatic]
Nebula creates a scheduled trigger that runs every Monday. You review the batch, approve (or edit), and the posts go out on schedule for the rest of the week.
Connect your integrations [#connect-your-integrations]
This recipe uses Twitter. Connect your Twitter account from the **Integrations** page so Nebula can schedule and publish posts on your behalf. If you want Nebula to pull content from your blog or CMS automatically, connect that integration as well.
Related recipes [#related-recipes]
# Social Media
Stay on top of your social presence without spending your day in Twitter. These recipes track what people are saying, help you respond, and keep your content moving.
**Uses:** Twitter. When you first ask Nebula to check your mentions, it will prompt you to connect your Twitter account.
# Monitor Twitter Mentions and Draft Replies
What you'll build [#what-youll-build]
Nebula watches your Twitter mentions and drafts replies for you to review. You stay on top of conversations without constantly refreshing Twitter.
What to say [#what-to-say]
What happens [#what-happens]
Pull your mentions [#pull-your-mentions]
Nebula asks your Twitter account for all mentions that arrived today and fetches the full context of each conversation.
Read and understand each mention [#read-and-understand-each-mention]
For each mention, Nebula reads the tweet, any thread context, and the account that sent it, so the reply fits the conversation, not just the single tweet.
Draft a reply [#draft-a-reply]
Nebula writes a contextual reply for each mention in a professional and friendly tone. Here's an example of what you might see:
***
@alice\_dev: *"Just tried @yourbrand for the first time. Really impressed with how fast the setup was!"*
Draft reply: "Thank you so much, Alice! Really glad the setup felt seamless! Let us know if there's anything we can help you with as you explore further."
***
@bob\_founder: *"@yourbrand any plans to support GitHub Actions integration?"*
Draft reply: "Great question, Bob! GitHub Actions integration is on our roadmap. Happy to share more details; feel free to DM us or drop your email and we'll keep you posted."
***
@carol\_ux: *"Shoutout to @yourbrand for their excellent support team. Issue resolved in under an hour!"*
Draft reply: "That means a lot, Carol! Thank you for sharing! We'll pass this along to the team. So glad we could help quickly."
Review before sending [#review-before-sending]
Nebula presents all the drafts together. You can edit any reply, skip ones you don't want to send, or ask Nebula to rewrite a draft with a different tone before anything goes live.
Make it automatic [#make-it-automatic]
You have two options depending on how hands-on you want to be.
**Check on a schedule**: Nebula checks your mentions every two hours and surfaces a batch of drafts for you to review:
**React as it happens**: Nebula drafts a reply the moment someone mentions you and sends it to you for approval before posting:
Connect your integrations [#connect-your-integrations]
This recipe uses Twitter. Connect your Twitter account from the **Integrations** page; Nebula uses OAuth so you stay in control of permissions. If you have more than one account connected, Nebula will ask which one to use.
Related recipes [#related-recipes]